> ## Documentation Index
> Fetch the complete documentation index at: https://support.lilt.com/llms.txt
> Use this file to discover all available pages before exploring further.
# Job Form Editor
> The Job Form Editor allows you to customize your job submission experience with organization-wide custom job properties. This feature enables you to capture important metadata, such as billing codes, department information, PO numbers, or job identifiers, at the job level, ensuring consistent data collection across your organization.
## Who this is for
* **Admins** who configure job submission for an organization or a specific domain.
* Teams who need to collect consistent **job-level metadata** at submission time.
## What you can do in the Custom Job Form Editor
* **Show / hide** optional sections of the Job Submission flow (so submitters only see what they need).
* Configure **defaults** (for example, default language settings or whether Verified is the default).
* Add **job-level custom properties** to capture organization-specific tracking information.
* Configure at **two levels**:
* **Organization-level** (applies by default)
* **Domain-level** (overrides organization defaults for that domain)
## Where to find it
1. In the LILT platform, open **Manage**.
2. Select **Job Form Editor**.
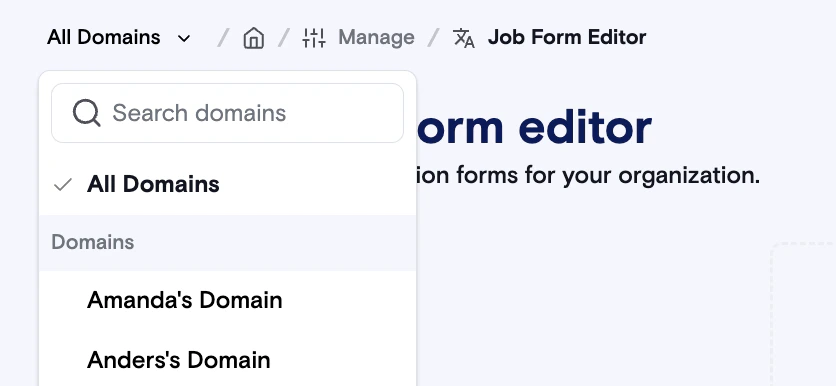
3. Choose whether you’re editing the **Organization** form or a **Domain** form by using the Domain selector at the top of the page.
 ## How organization vs. domain configuration works
* **Organization form** defines the default job submission experience.
* **Domain form** can:
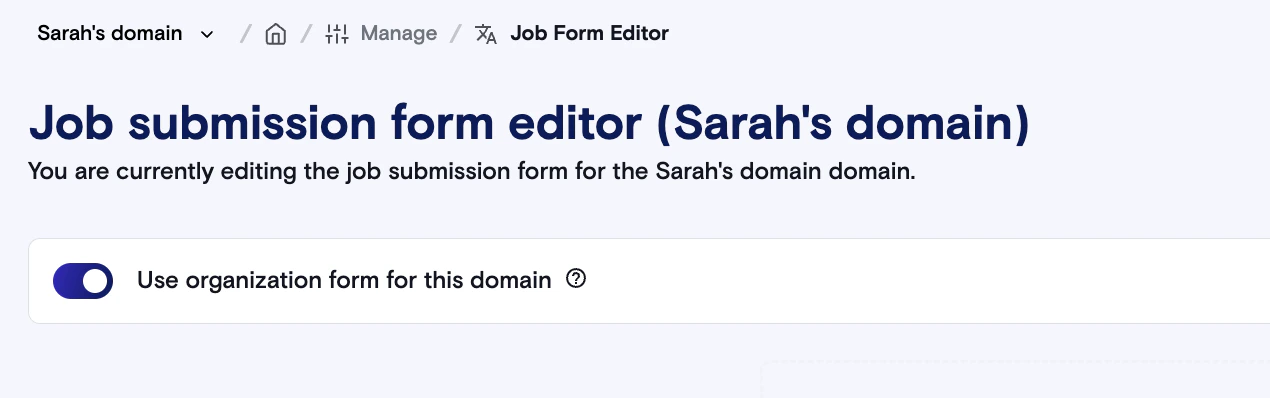
* Use the organization form as-is by selecting "Use organization form for this domain.", or
* Override which fields/steps are shown and which defaults apply for that domain.
## How organization vs. domain configuration works
* **Organization form** defines the default job submission experience.
* **Domain form** can:
* Use the organization form as-is by selecting "Use organization form for this domain.", or
* Override which fields/steps are shown and which defaults apply for that domain.
 ### Recommended setup approach
1. Configure the **organization** form first.
2. Only create **domain overrides** when a domain truly needs a different submission experience.
***
# Configure your Job Submission form
## Step 1: Review required vs. optional sections
Some steps are always required for Job Submission (for example, file upload), while other steps can be optional depending on your organization’s setup.
In the Custom Job Form Editor:
* Ensure required steps are present.
* For optional steps, decide whether to:
* Show them to all submitters,
* Hide them entirely, or
* Make them conditional (if available in your deployment).
* PO Number and Invoice Split are populated for LILT services customers with information from their account, but can be hidden if not relevant.
## Step 2: Set defaults
Use defaults to minimize work for submitters and reduce incorrect submissions.
Common defaults include:
* **Instant vs. Verified** default behavior
### Recommended setup approach
1. Configure the **organization** form first.
2. Only create **domain overrides** when a domain truly needs a different submission experience.
***
# Configure your Job Submission form
## Step 1: Review required vs. optional sections
Some steps are always required for Job Submission (for example, file upload), while other steps can be optional depending on your organization’s setup.
In the Custom Job Form Editor:
* Ensure required steps are present.
* For optional steps, decide whether to:
* Show them to all submitters,
* Hide them entirely, or
* Make them conditional (if available in your deployment).
* PO Number and Invoice Split are populated for LILT services customers with information from their account, but can be hidden if not relevant.
## Step 2: Set defaults
Use defaults to minimize work for submitters and reduce incorrect submissions.
Common defaults include:
* **Instant vs. Verified** default behavior
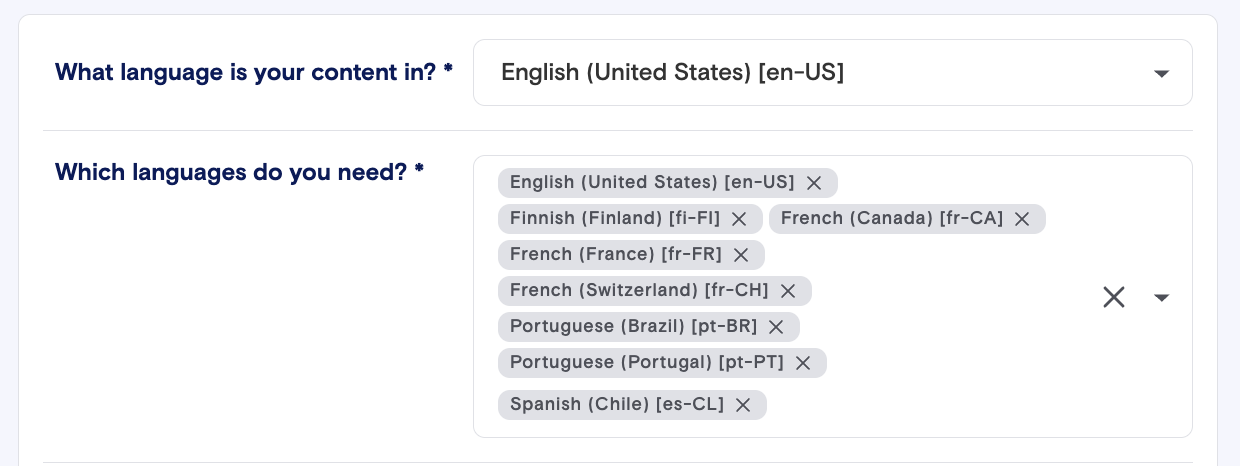
 * **Default source / target languages** (when applicable)
 ## Step 3: Add job-level custom properties
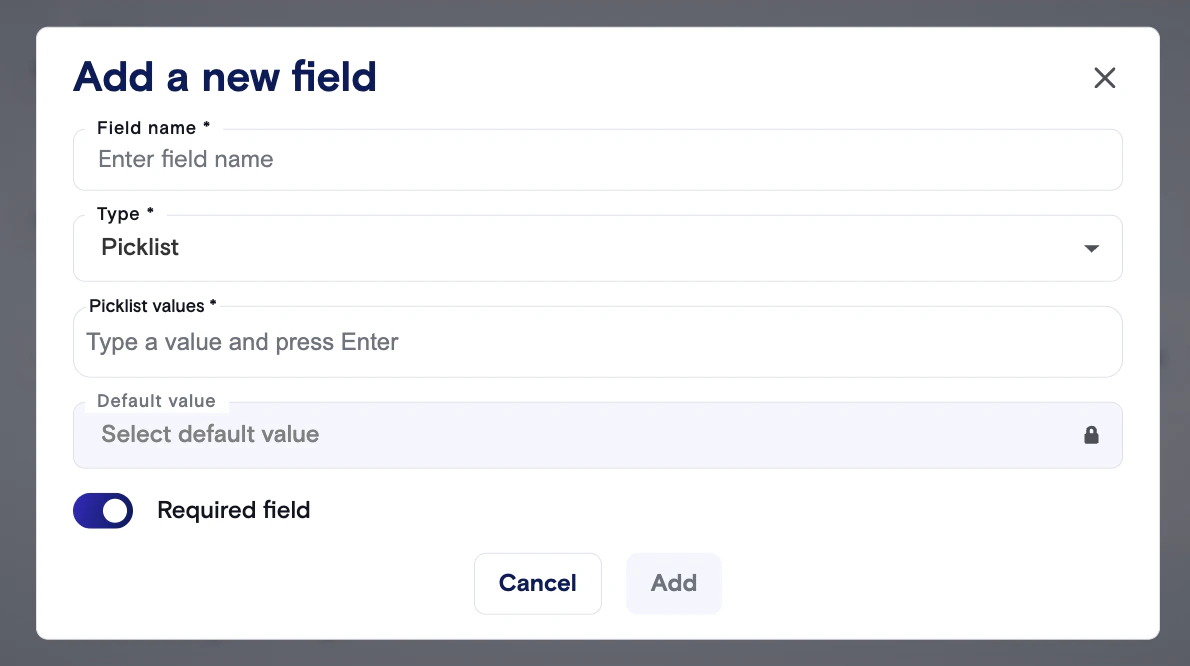
Custom job fields are best for metadata you want to capture *every time* a job is created. Custom properties added to a job will automatically propagate to all projects within that job. Common use cases include:
* **Internal billing and chargebacks**: Capture department codes or cost centers to allocate translation costs
* **PO number tracking**: Link jobs to purchase orders for procurement workflows
* **Project categorization**: Tag jobs by campaign, customer, or project type for better organization
* **Compliance tracking**: Record certification requirements or compliance flags
* **Multi-team coordination**: Identify which team or division requested the translation work
### Supported field types
Depending on your configuration, custom fields may include:
* **Text**
* **Checkbox**
* **Picklist / dropdown**
* **URL**
### Make a field required (optional)
If a field is required, submitters cannot complete Job Submission until it’s filled in.
## Step 3: Add job-level custom properties
Custom job fields are best for metadata you want to capture *every time* a job is created. Custom properties added to a job will automatically propagate to all projects within that job. Common use cases include:
* **Internal billing and chargebacks**: Capture department codes or cost centers to allocate translation costs
* **PO number tracking**: Link jobs to purchase orders for procurement workflows
* **Project categorization**: Tag jobs by campaign, customer, or project type for better organization
* **Compliance tracking**: Record certification requirements or compliance flags
* **Multi-team coordination**: Identify which team or division requested the translation work
### Supported field types
Depending on your configuration, custom fields may include:
* **Text**
* **Checkbox**
* **Picklist / dropdown**
* **URL**
### Make a field required (optional)
If a field is required, submitters cannot complete Job Submission until it’s filled in.
 ### Important notes
* Custom properties only apply to jobs created **after** the property is defined. They are not backfilled to existing jobs.
* All user roles can see and use custom properties if they are enabled for your organization.
* If you delete a custom property, it will no longer appear during job creation, but historical data is preserved.
## Step 4: Save and publish
After making changes:
1. **Save / Publish** the form.
2. Start a **new** Job Submission to confirm the updated flow is displayed as expected.
***
# What happens after a job is created
## Where to see custom field values
Custom job field values are stored as job metadata and can be viewed on the job after submission in [Job Settings](https://support.lilt.com/kb/navigating-the-jobs-list#job-settings).
## Editing values after submission
If enabled in your deployment, you can edit job metadata after creation in Job Settings (useful when a PO number is issued later).
## Filtering and reporting
If enabled, jobs can be **filtered** using the custom fields configured in the Job Form Editor on the Jobs page. For example, filter by PO number, department, or other tracking fields.
***
# Troubleshooting
## I updated the form, but the Job Submission page didn’t change
* Confirm you edited the correct scope (**Organization** vs **Domain**).
* Confirm you **published** changes.
* Start a **new** job submission (changes may not apply to already-created jobs).
## A domain change affected other domains
Domain overrides should only apply to the selected domain. If you see changes leaking across domains, capture:
* Which domain you edited
* Which domains are unexpectedly affected
* A screenshot or short screen recording
…and report it to your LILT support contact.
## Job submission is blocked even though all fields look complete
* Check for a required field that is:
* Hidden behind a collapsed section, or
* Off-screen (scroll to the top and look for validation highlights)
* If quoting is enabled, confirm any quote-required steps are completed.
***
# Admin best practices
* Keep the submission form **minimal** for most domains; add complexity only where it drives real business value.
* Use **consistent naming** for custom fields so reporting and filtering remains clean.
* Avoid creating a custom field with the same name as a standard field (for example, “Status”) to prevent confusion.
### Important notes
* Custom properties only apply to jobs created **after** the property is defined. They are not backfilled to existing jobs.
* All user roles can see and use custom properties if they are enabled for your organization.
* If you delete a custom property, it will no longer appear during job creation, but historical data is preserved.
## Step 4: Save and publish
After making changes:
1. **Save / Publish** the form.
2. Start a **new** Job Submission to confirm the updated flow is displayed as expected.
***
# What happens after a job is created
## Where to see custom field values
Custom job field values are stored as job metadata and can be viewed on the job after submission in [Job Settings](https://support.lilt.com/kb/navigating-the-jobs-list#job-settings).
## Editing values after submission
If enabled in your deployment, you can edit job metadata after creation in Job Settings (useful when a PO number is issued later).
## Filtering and reporting
If enabled, jobs can be **filtered** using the custom fields configured in the Job Form Editor on the Jobs page. For example, filter by PO number, department, or other tracking fields.
***
# Troubleshooting
## I updated the form, but the Job Submission page didn’t change
* Confirm you edited the correct scope (**Organization** vs **Domain**).
* Confirm you **published** changes.
* Start a **new** job submission (changes may not apply to already-created jobs).
## A domain change affected other domains
Domain overrides should only apply to the selected domain. If you see changes leaking across domains, capture:
* Which domain you edited
* Which domains are unexpectedly affected
* A screenshot or short screen recording
…and report it to your LILT support contact.
## Job submission is blocked even though all fields look complete
* Check for a required field that is:
* Hidden behind a collapsed section, or
* Off-screen (scroll to the top and look for validation highlights)
* If quoting is enabled, confirm any quote-required steps are completed.
***
# Admin best practices
* Keep the submission form **minimal** for most domains; add complexity only where it drives real business value.
* Use **consistent naming** for custom fields so reporting and filtering remains clean.
* Avoid creating a custom field with the same name as a standard field (for example, “Status”) to prevent confusion.