> ## Documentation Index
> Fetch the complete documentation index at: https://support.lilt.com/llms.txt
> Use this file to discover all available pages before exploring further.
# BitBucket
> This guide provides step-by-step instructions for configuring and utilizing the BitBucket Server connector with minimal configurations for ensuring a successful round trip.
## Overview
Once all configuration parameters are set, the connector will be able to:
* Clone the source branch from your repository
* Process files for translation
* Push translated files to the delivery branch
* Create pull requests with the specified template
## Configuration
1. Configure Bitbucket Host.
**Parameter:** Bitbucket Host
**Description:** The base URL of your BitBucket Server instance. This is typically unique for each client.
**Examples:**
* Testing environment: `http://34.72.91.92:7990`
* Customer environment: `https://salesforce.bitbucket.com/`
2. Set Bitbucket project key.
**Parameter:** Bitbucket Project Key
**Description:** The project key required for API requests.
**How to obtain:**
* Navigate to **Projects** in BitBucket Server.
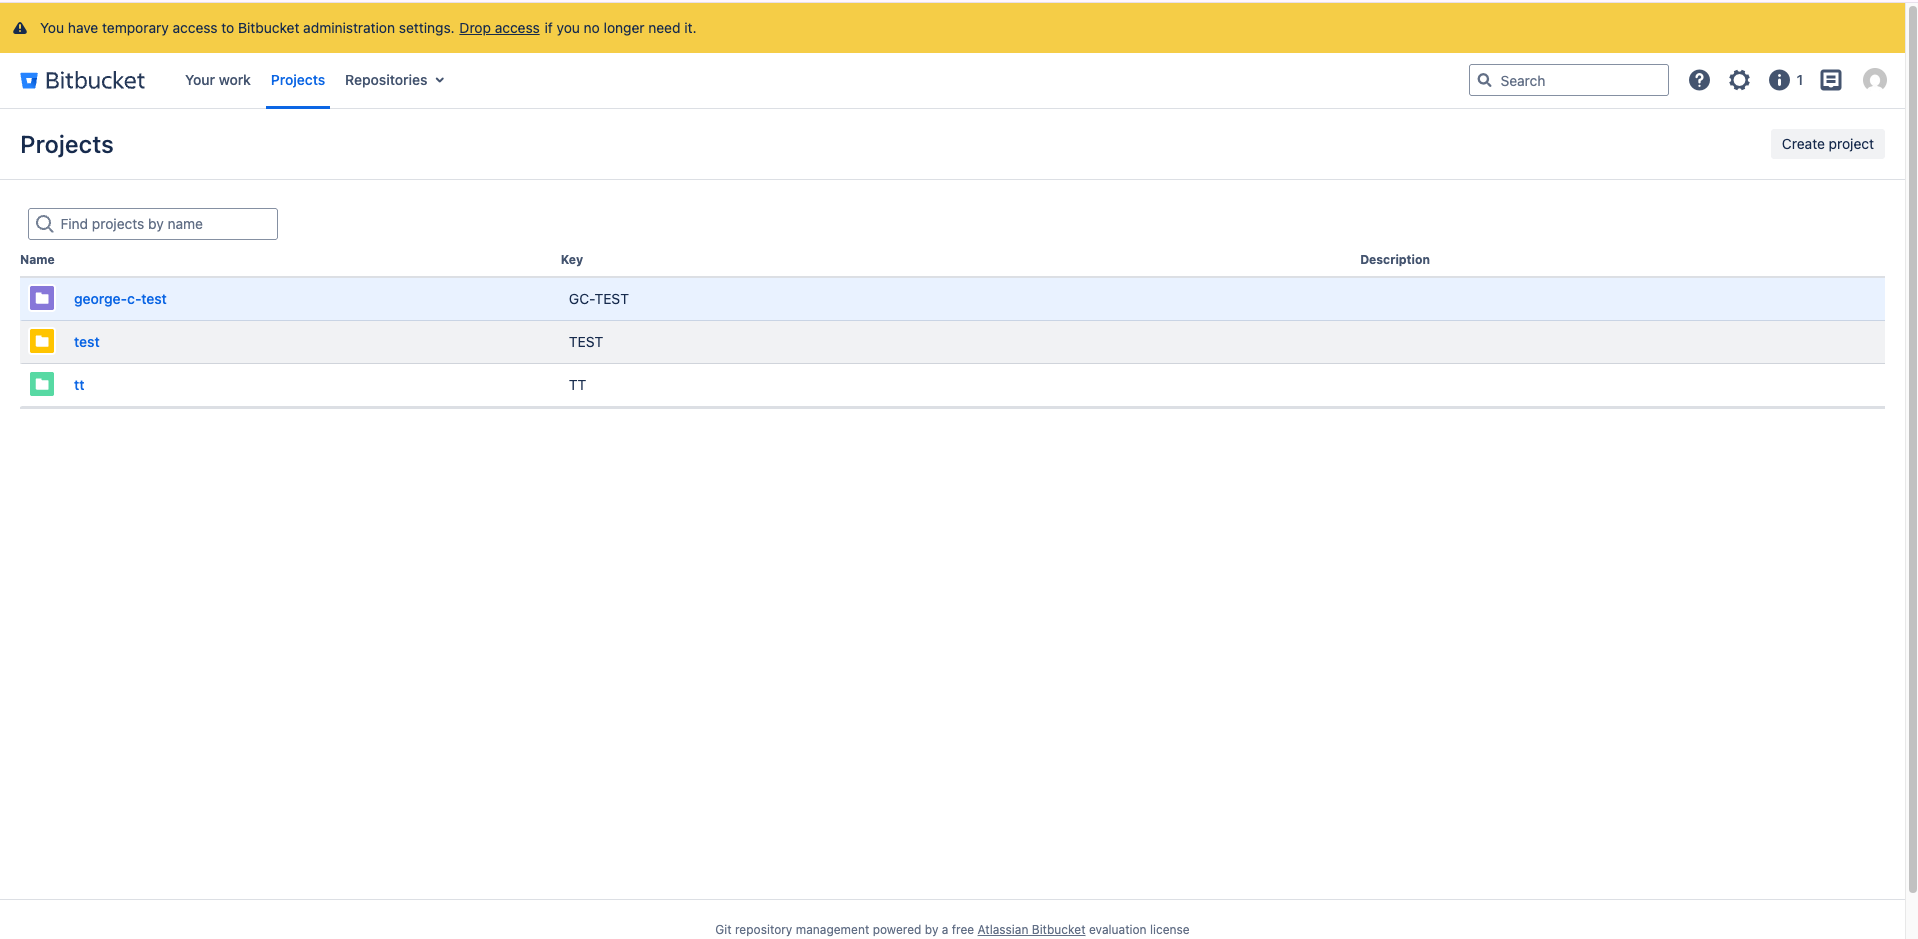 * Select the project containing your repository
* Go to **Project Settings**.
* Select the project containing your repository
* Go to **Project Settings**.
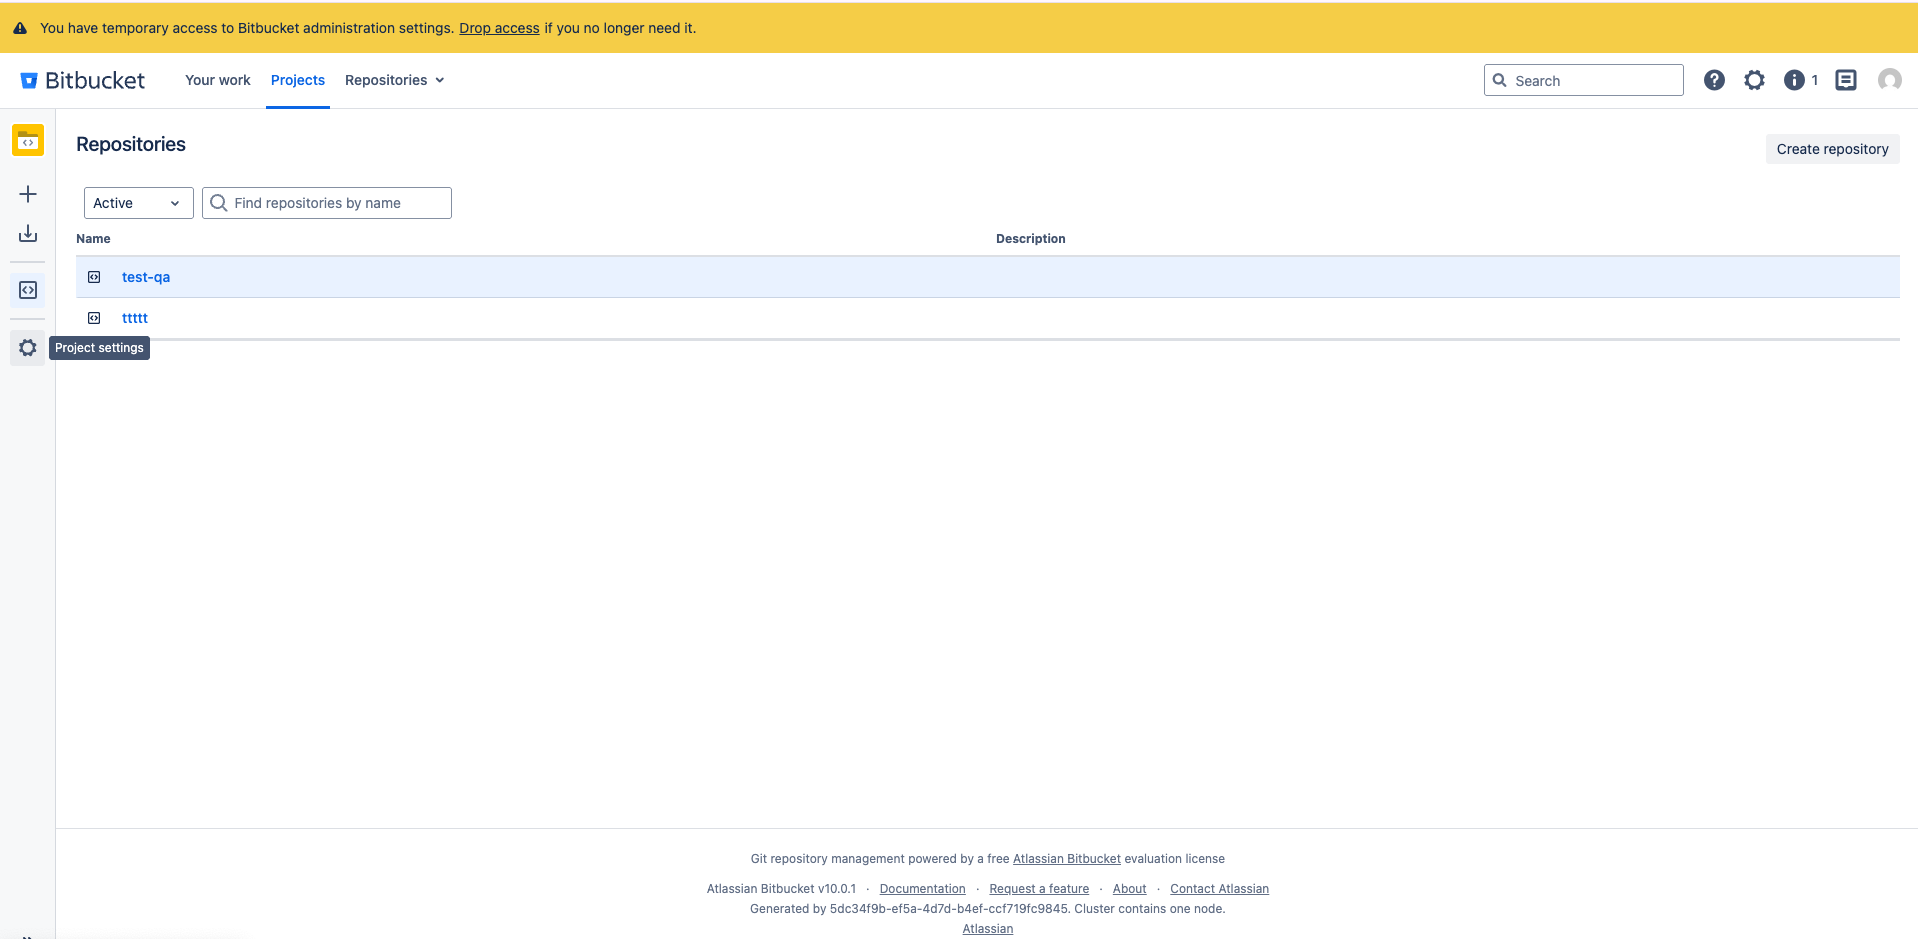 * On the **Project Details** page, locate the **Project Key**.
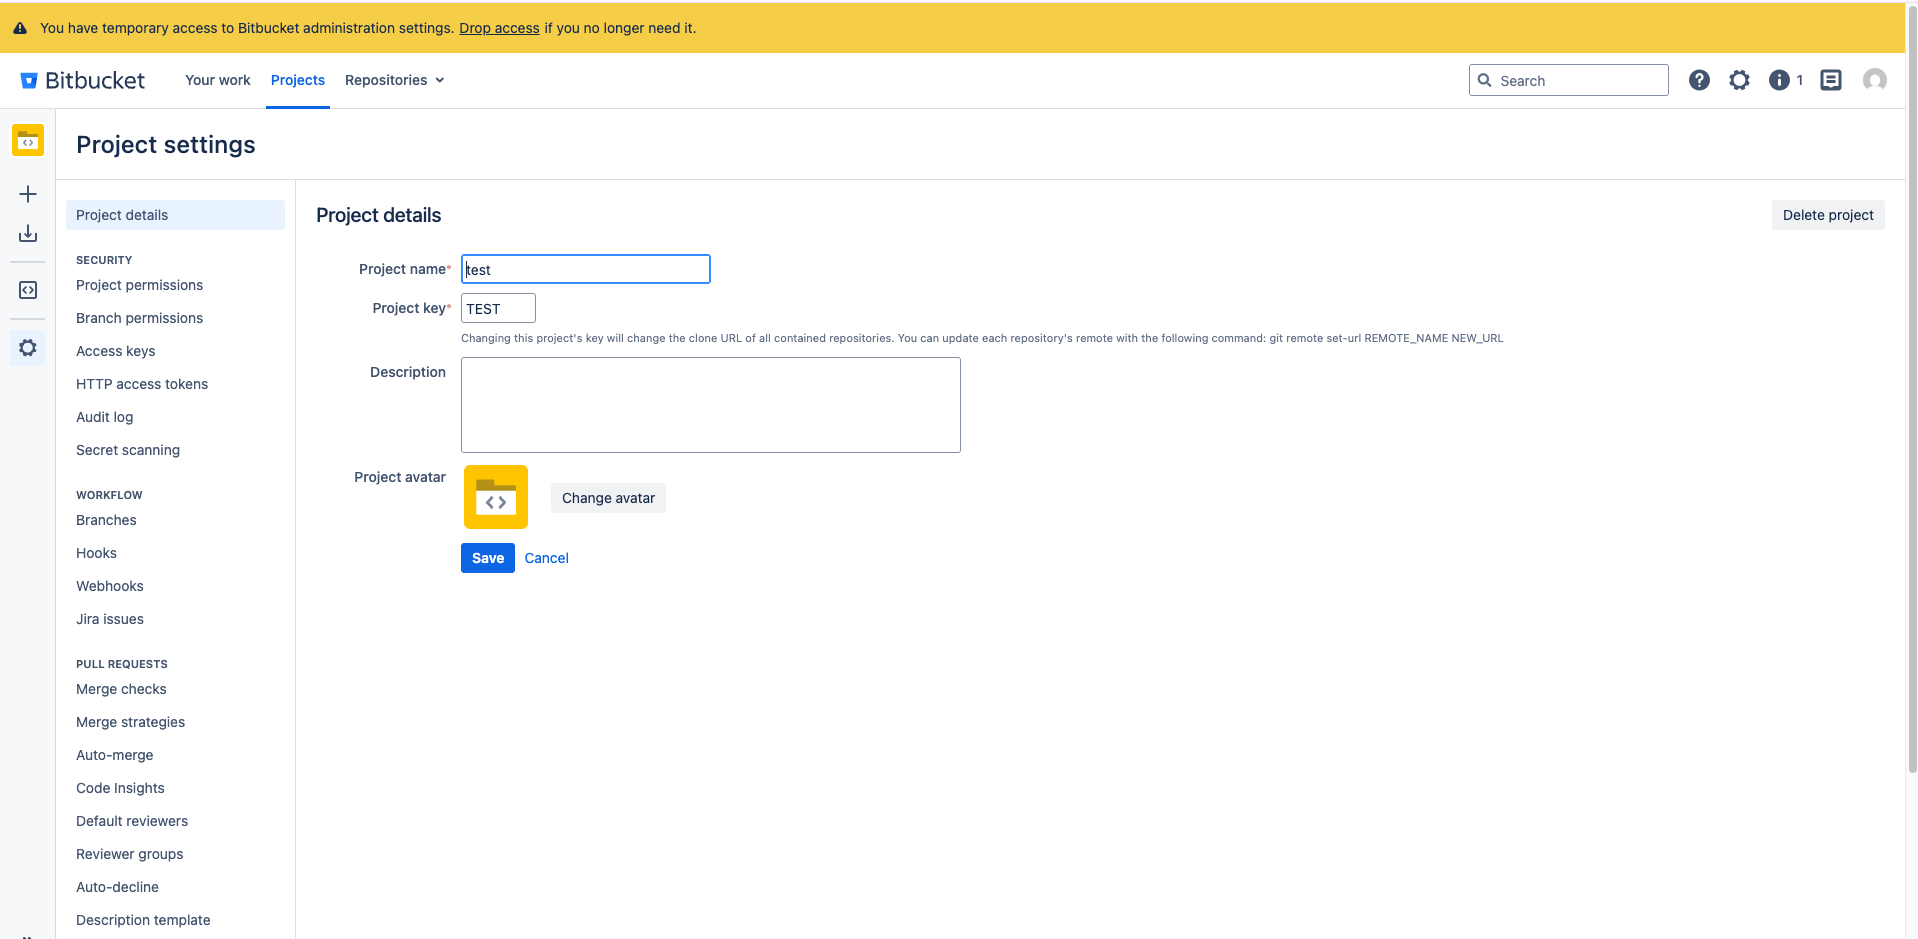 * Copy the key and paste it into the connector configuration
3. Configure repository name.
**Parameter:** Bitbucket Repository Name
**Description:** The name of the repository to connect to.
**How to obtain:**
* Navigate to your target repository.
* Copy the key and paste it into the connector configuration
3. Configure repository name.
**Parameter:** Bitbucket Repository Name
**Description:** The name of the repository to connect to.
**How to obtain:**
* Navigate to your target repository.
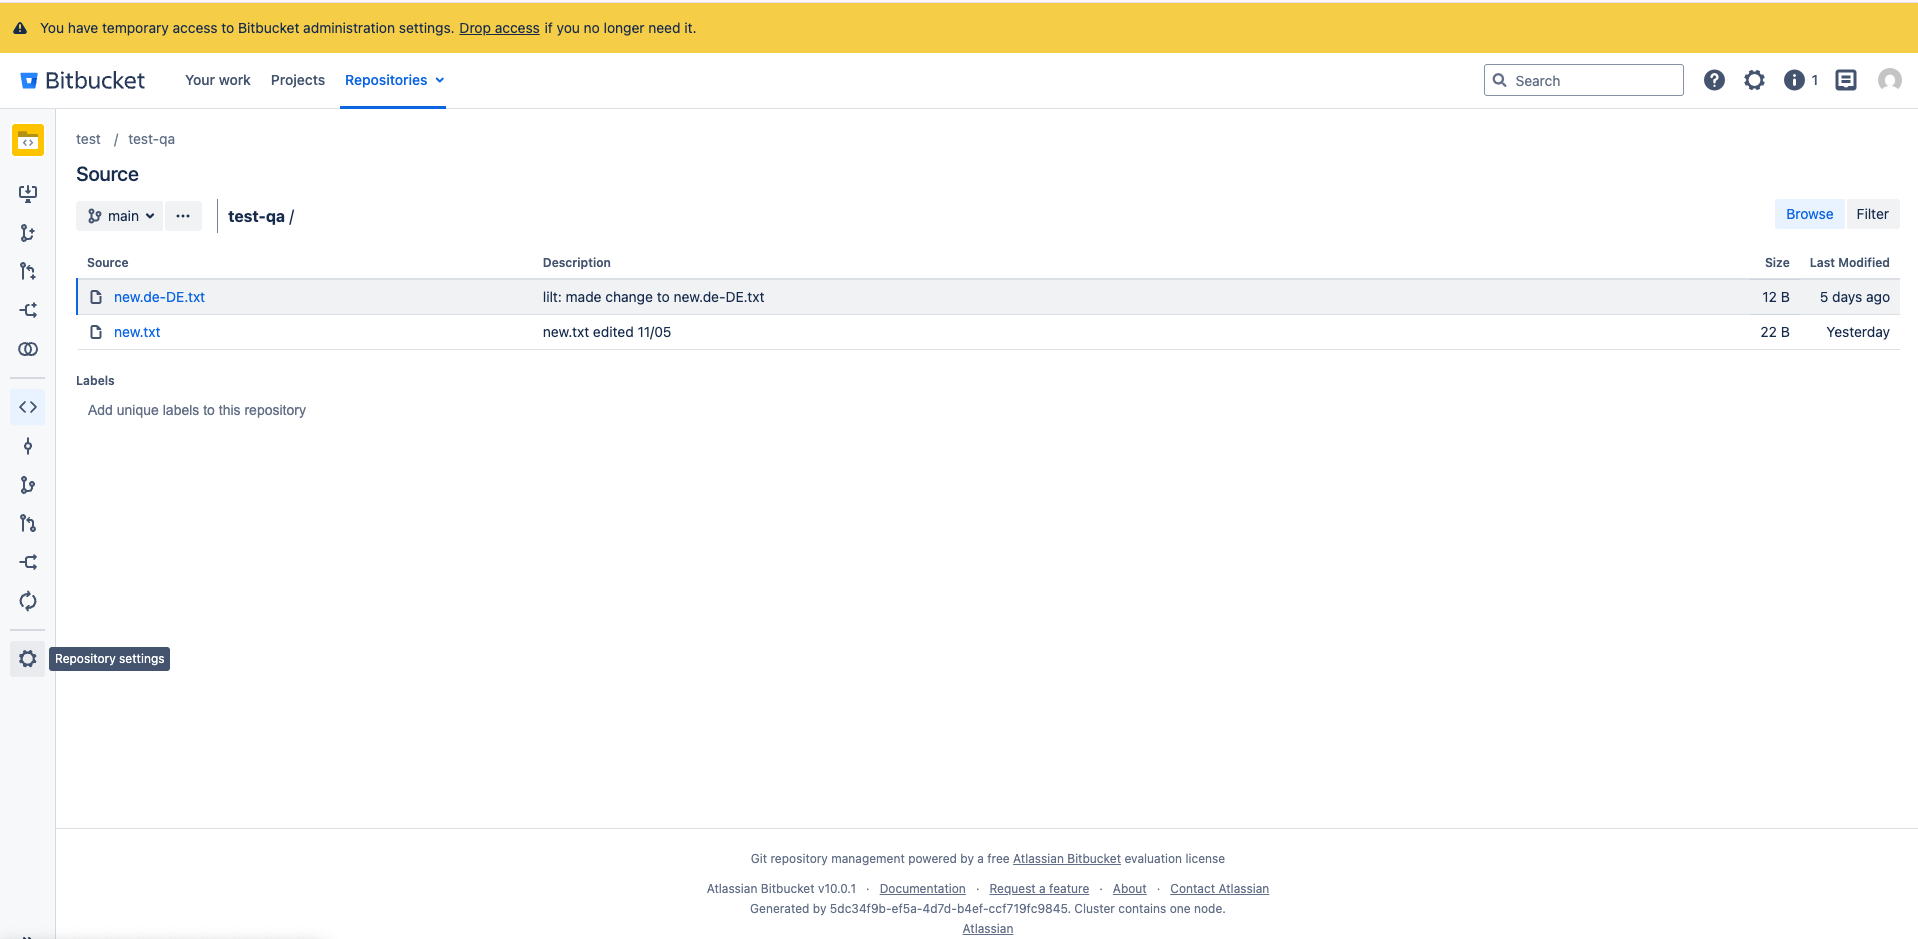 * Go to **Settings**.
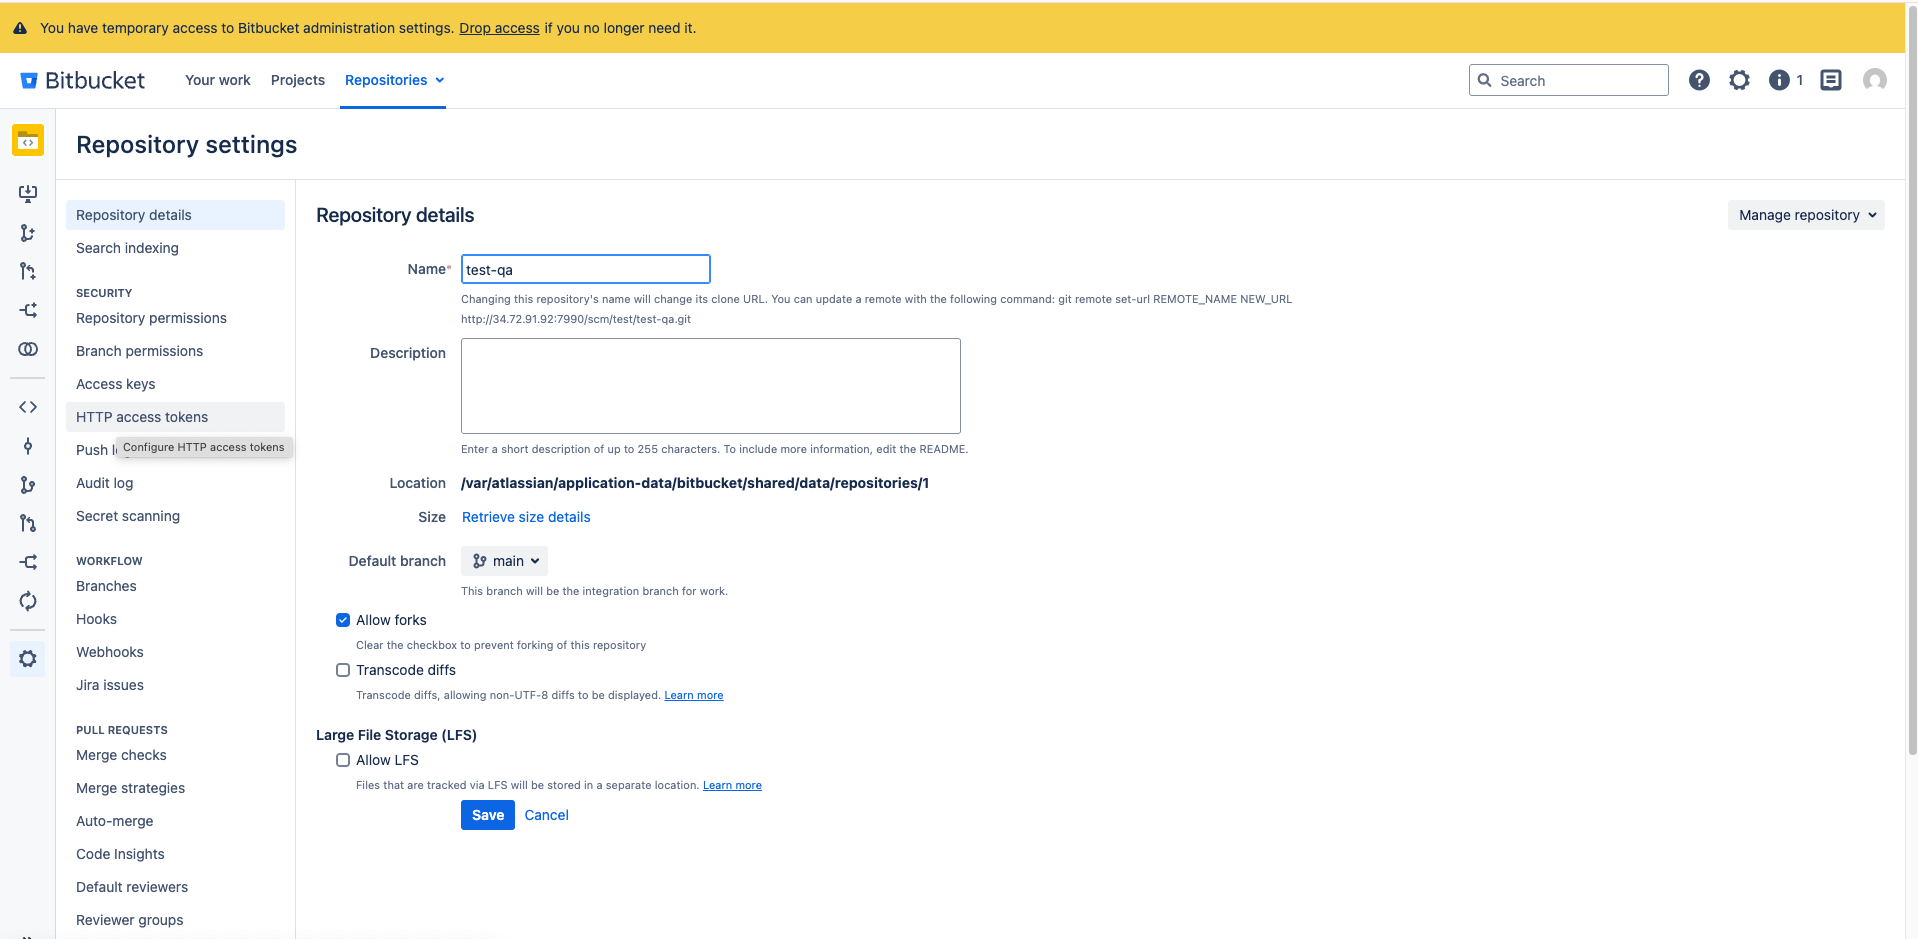 * On the **Repository Details** page, find the repository name (test-qa).
* Copy and paste it into the connector configuration.
4. Set Git Repo URL.
**Parameter:** Git Repo URL
**Description:** The full repository URL used for Git operations.
**How to obtain:**
* Navigate to your target repository.
* On the **Repository Details** page, find the repository name (test-qa).
* Copy and paste it into the connector configuration.
4. Set Git Repo URL.
**Parameter:** Git Repo URL
**Description:** The full repository URL used for Git operations.
**How to obtain:**
* Navigate to your target repository.
.png?fit=max&auto=format&n=a3Mk_Q36s4Ku-LT-&q=85&s=d5e748d2f419e2a539eff7e6c454284c) * Go to **Settings**.
* Go to **Settings**.
.png?fit=max&auto=format&n=a3Mk_Q36s4Ku-LT-&q=85&s=c44ab7983f28358d092e0fbf64feaddf) * On the **Repository Details** page, locate the repository URL.
* On the **Repository Details** page, locate the repository URL.
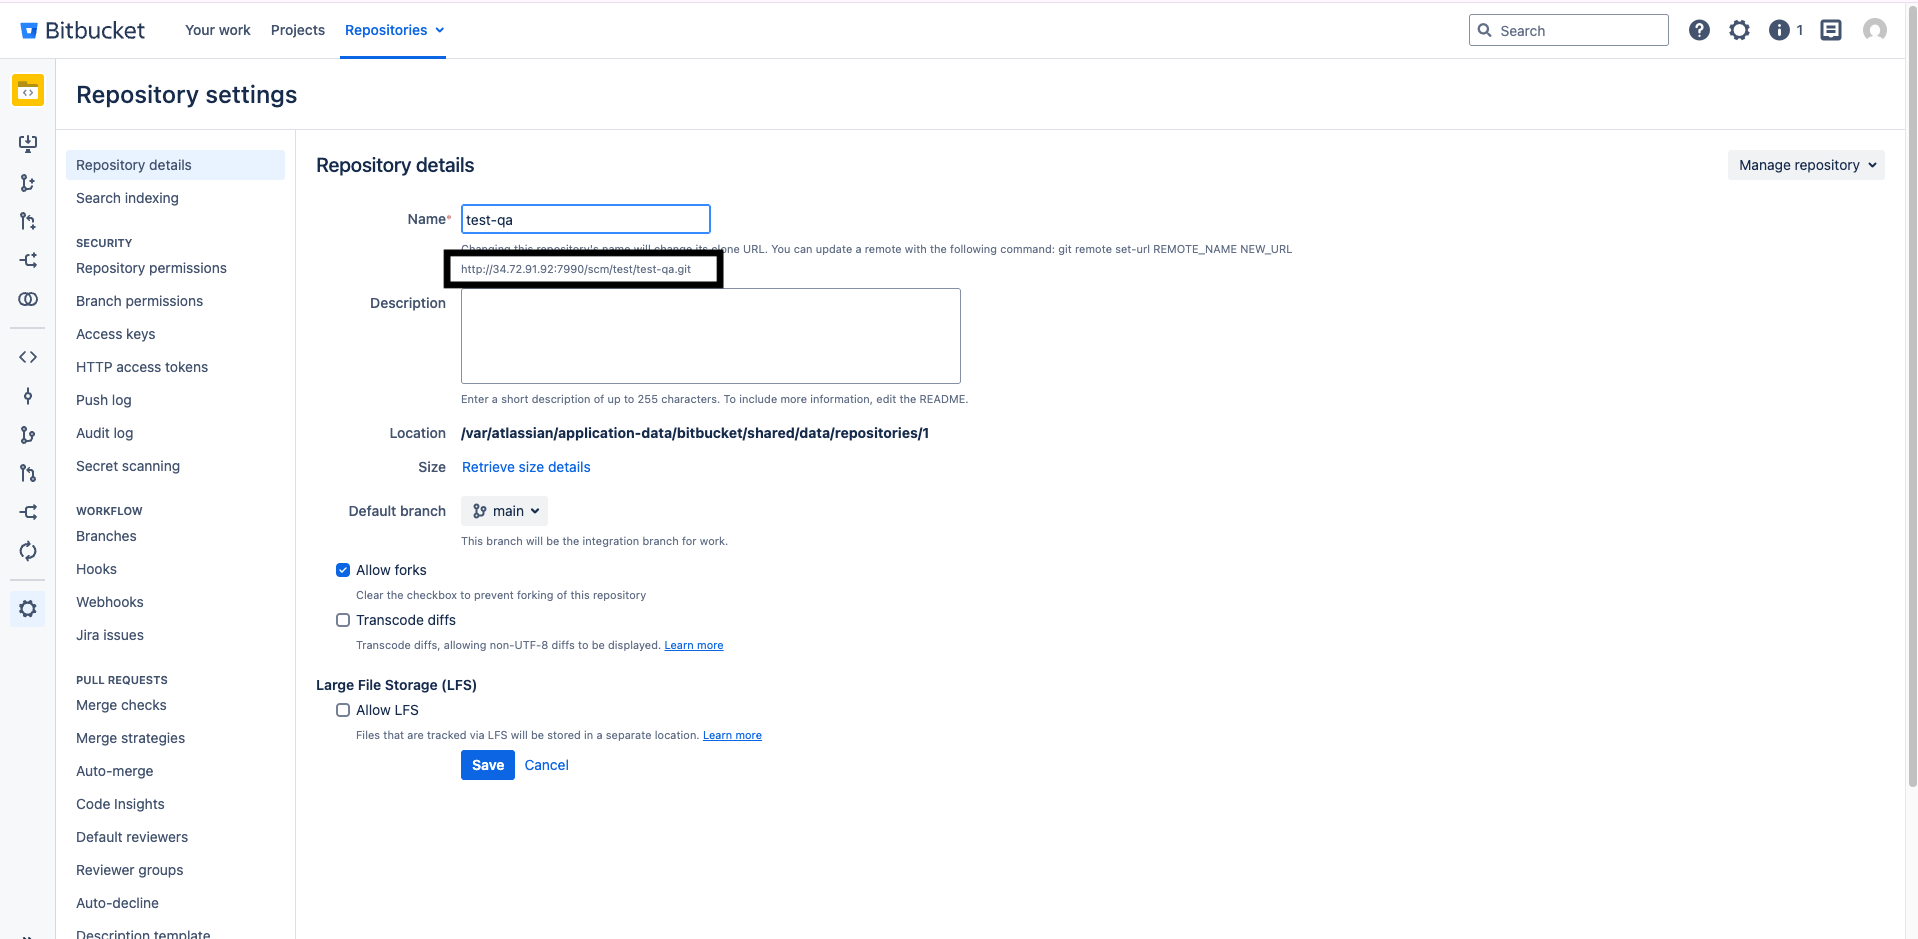 * Copy the URL and paste it into the connector configuration.
5. There are two ways to use this connector. We outline both below. Bitbucket\_Server will have a dynamic source branch selection enabled but also inherits the regular Git connector single source branch.
1. Single source branch flow
2. Dynamic source branch flow
6. Generate Bitbucket API token.
**Parameter:** Bitbucket API Token
**Description:** A user-specific access token used by the connector to create pull requests via the BitBucket API.
**How to generate:**
* Navigate to **Manage Account** (User Settings).
* Copy the URL and paste it into the connector configuration.
5. There are two ways to use this connector. We outline both below. Bitbucket\_Server will have a dynamic source branch selection enabled but also inherits the regular Git connector single source branch.
1. Single source branch flow
2. Dynamic source branch flow
6. Generate Bitbucket API token.
**Parameter:** Bitbucket API Token
**Description:** A user-specific access token used by the connector to create pull requests via the BitBucket API.
**How to generate:**
* Navigate to **Manage Account** (User Settings).
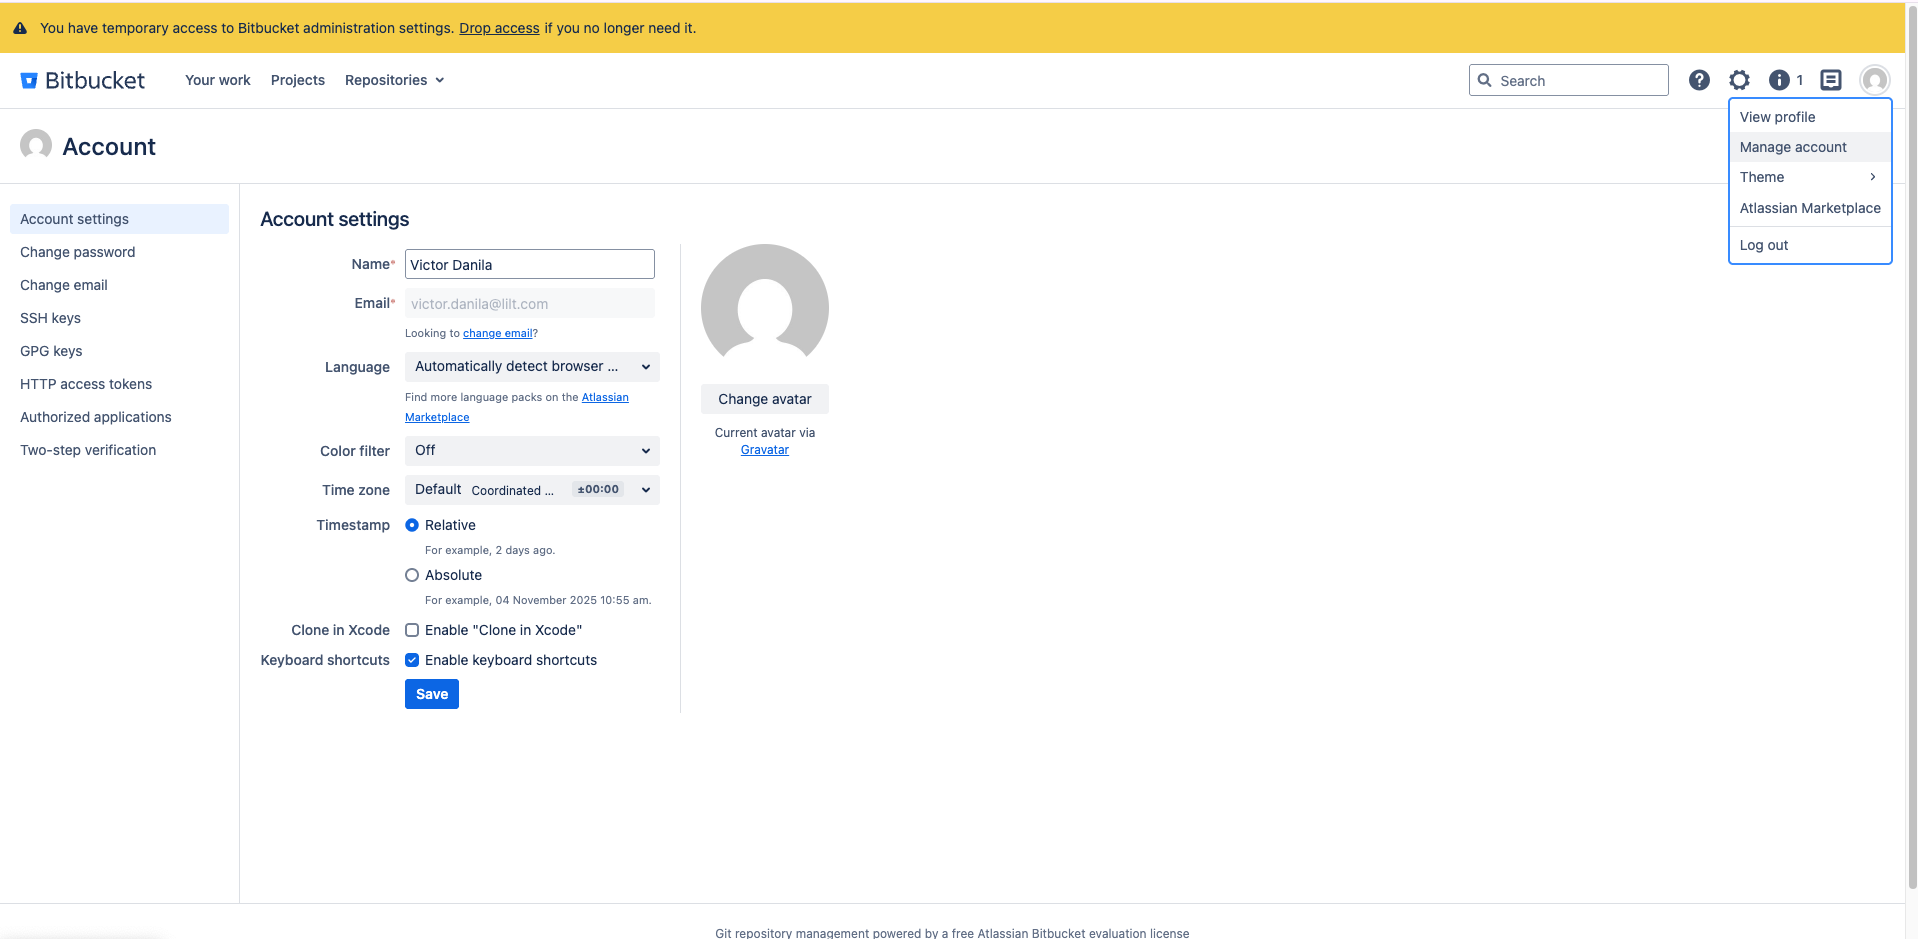 * Select **HTTP Access Tokens**.
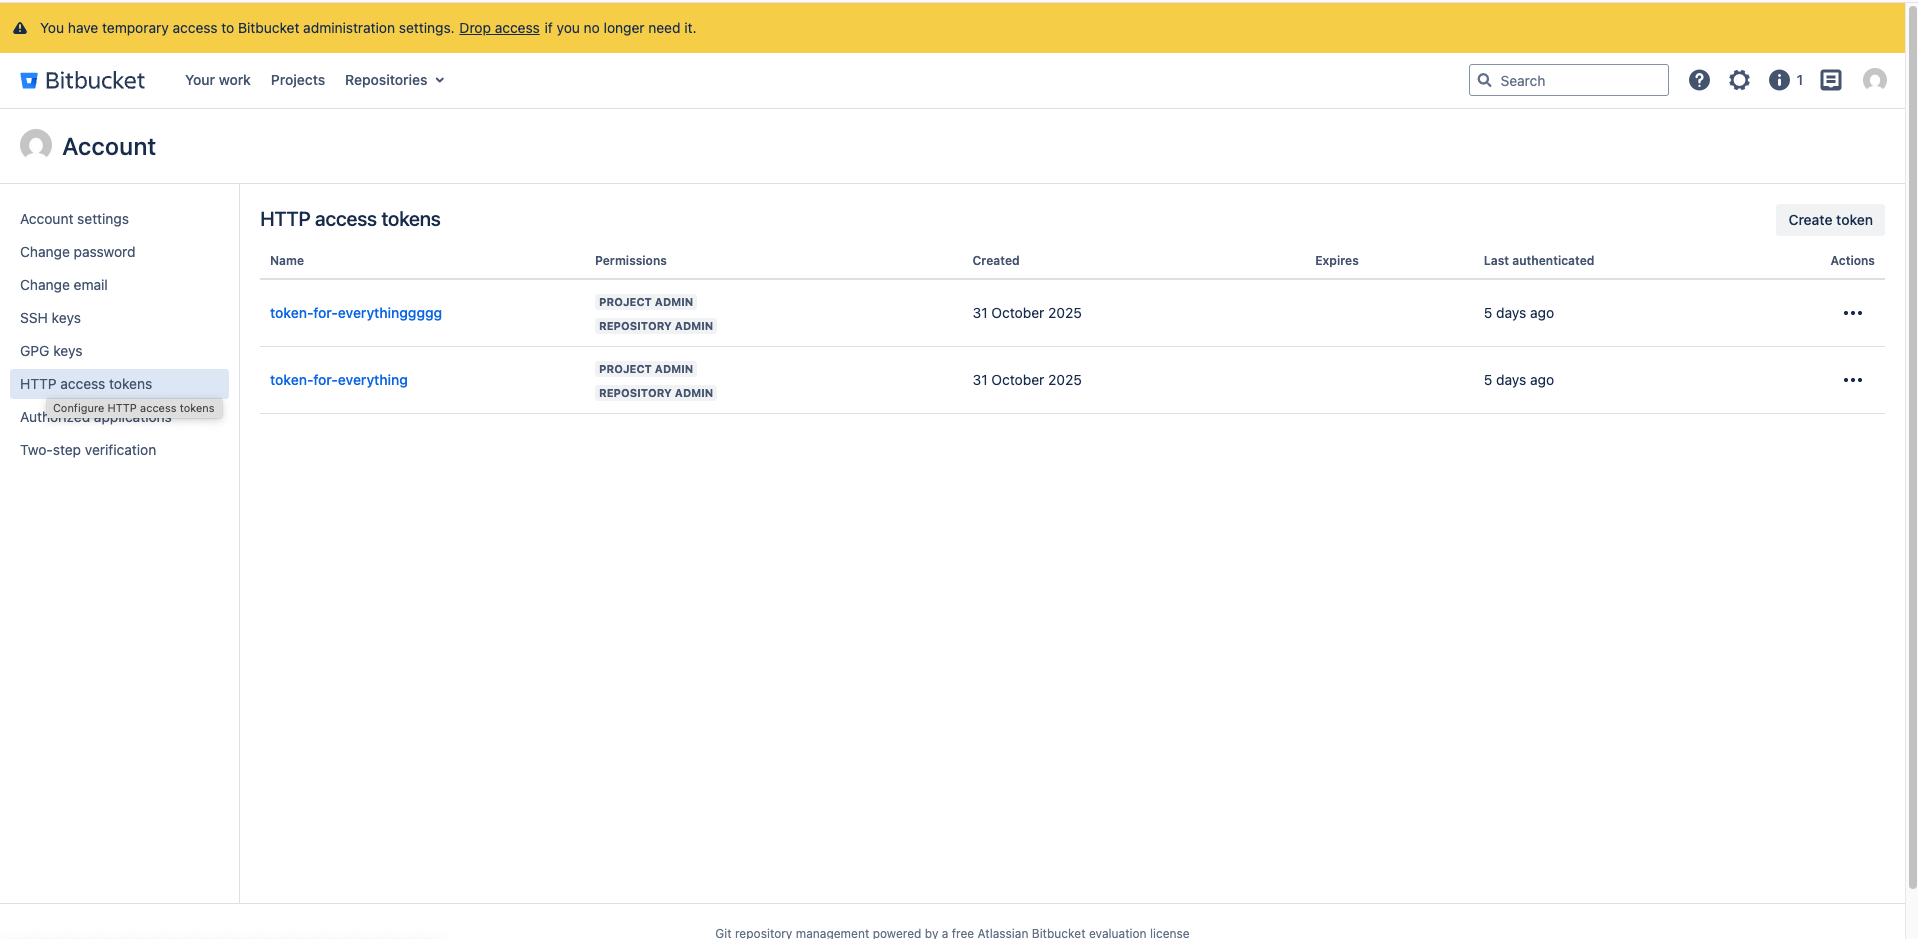 * Click **Generate Token**.
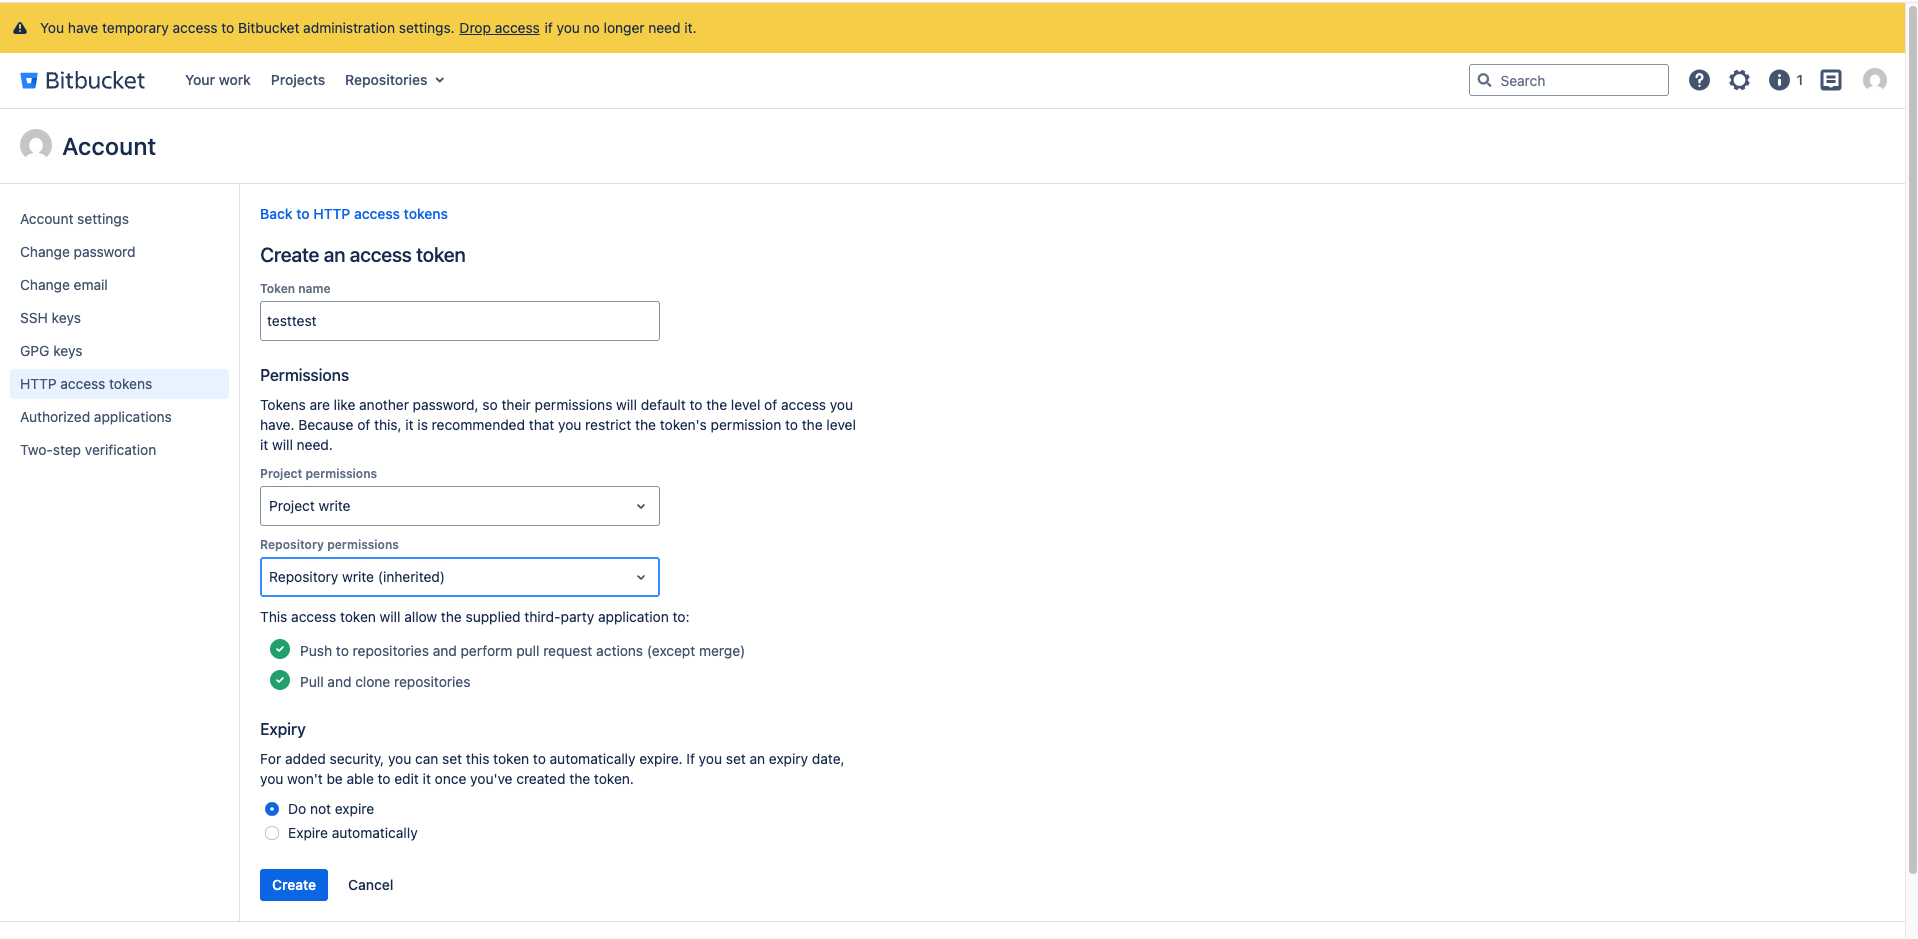 * Grant **Read** and **Write** permissions.
* Copy the token immediately (it can only be copied once).
* Save the token in the connector configuration.
***Important:*** This token is associated with a specific user account. When a pull requests is created, it points to the account for which the token is generated. It MUST NOT be a Bitbucket GIT Token.
7. Set Bitbucket account user.
**Parameter:** Bitbucket Account User
**Description:** The username of the BitBucket account for which the API token was generated (from Step 7).
8. Generate Bitbucket GIT token.
**Parameter:** Bitbucket GIT Token
**Description:** An HTTP access token used specifically for cloning and pushing to the repository via Git.
**How to generate:**
* Navigate to your target repository.
* Grant **Read** and **Write** permissions.
* Copy the token immediately (it can only be copied once).
* Save the token in the connector configuration.
***Important:*** This token is associated with a specific user account. When a pull requests is created, it points to the account for which the token is generated. It MUST NOT be a Bitbucket GIT Token.
7. Set Bitbucket account user.
**Parameter:** Bitbucket Account User
**Description:** The username of the BitBucket account for which the API token was generated (from Step 7).
8. Generate Bitbucket GIT token.
**Parameter:** Bitbucket GIT Token
**Description:** An HTTP access token used specifically for cloning and pushing to the repository via Git.
**How to generate:**
* Navigate to your target repository.
.png?fit=max&auto=format&n=a3Mk_Q36s4Ku-LT-&q=85&s=b58bfbc89c0e87b32f4085aed2008a65) * Go to **Settings**.
* Go to **Settings**.
.png?fit=max&auto=format&n=a3Mk_Q36s4Ku-LT-&q=85&s=d591755ac7efadc8ba87dbc183041992) * Select **HTTP Access Tokens**.
* Select **HTTP Access Tokens**.
.png?fit=max&auto=format&n=a3Mk_Q36s4Ku-LT-&q=85&s=370f5fa1d7455123bd64db68b1ace95c) * Click **Generate Token**.
* Click **Generate Token**.
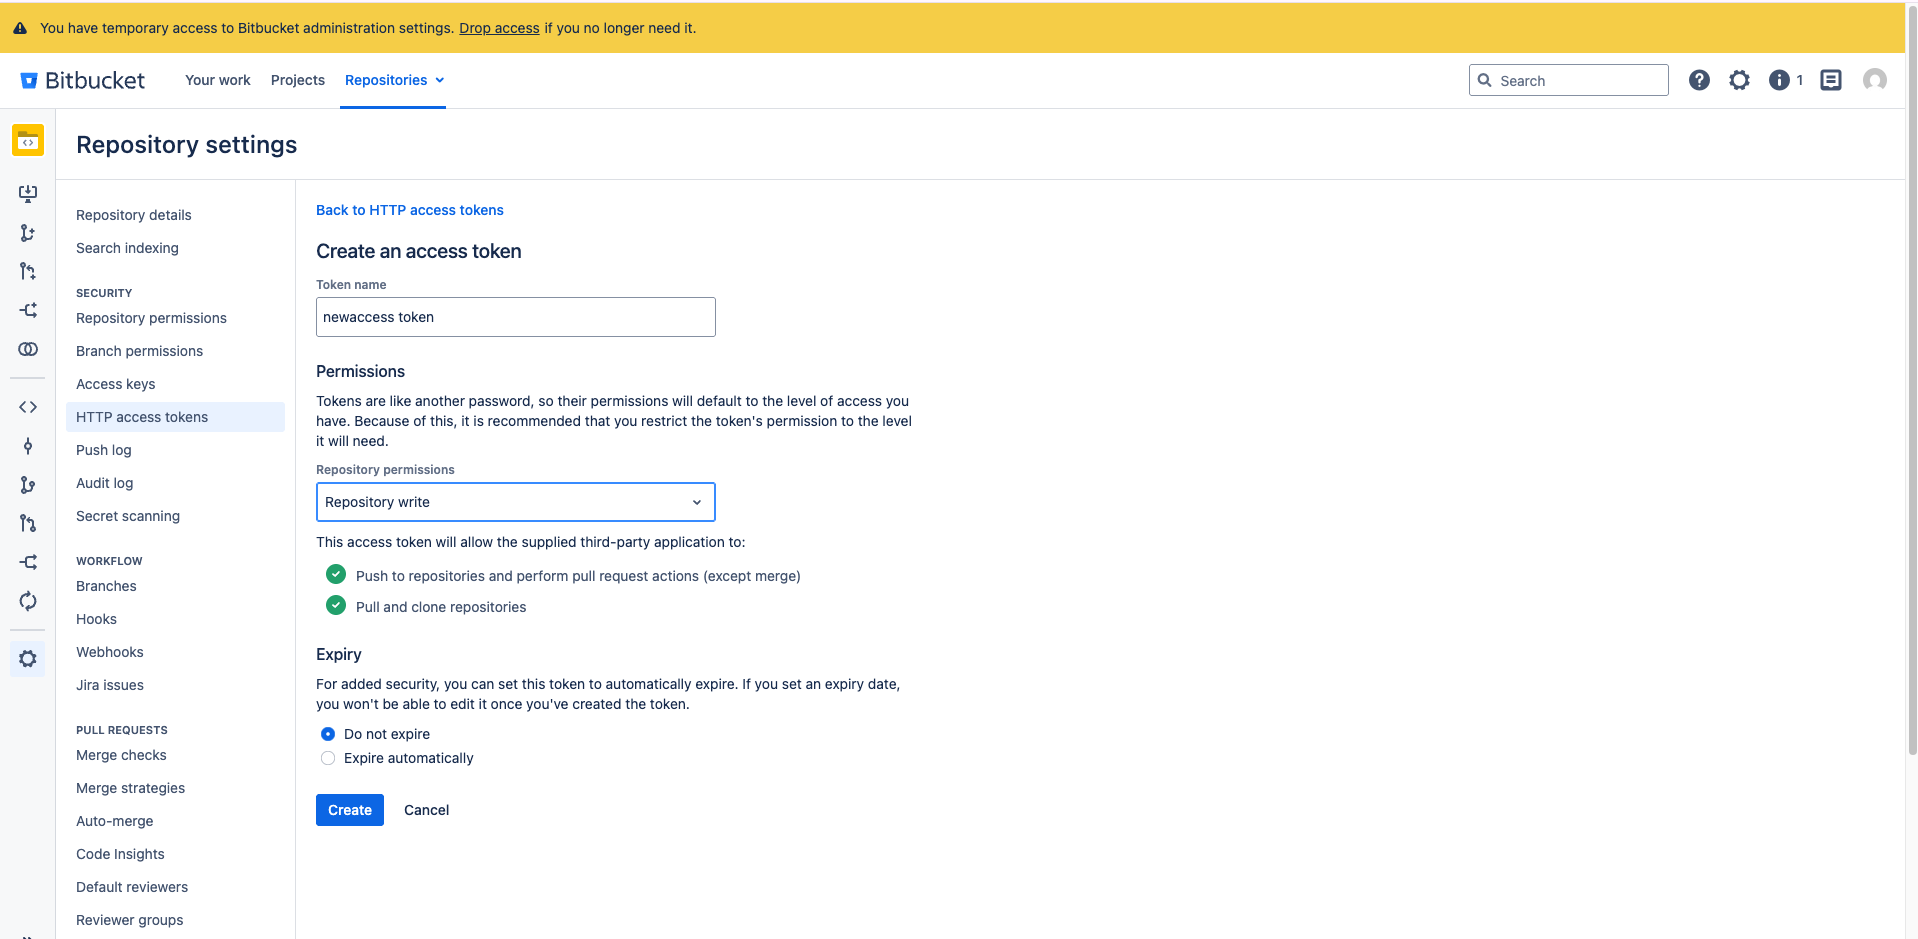 * Grant **Read** and **Write** permissions.
* Copy the token immediately (it can only be copied once).
* Save the token in the connector configuration.
**Note:** This is separate from the API token and is used for Git operations ONLY. Do not use it for BitBucket API Token configuration.
9. Configure pull request template
**Parameter:** Bitbucket Pull Request Template
**Description:** The title template used for pull requests created by the connector.
**Example:** `[Translation] {language} - {date}`, `Update translations for {target_locale}`
## Configuration example
```
{
"project_prefix": "[QA] BitBucket Server v1",
"target_memories": {
"de-DE": {
"id": 14384
}
},
"lilt_api_key": "redacted",
"fs_export_path_map": {},
"git_delivery_branch_template": "wwtest-new-branch-newwww",
"git_repo_url": "http://34.72.91.92:7990/scm/test/test-qa.git",
"git_source_branch": "main",
"bitbucket_access_token": "BBDC-NTAxMzI0NjkxMDE0Oq9H+QWjb8zFB0redacted",
"bitbucket_pr_template": "test-template",
"bitbucket_project_key": "TEST",
"bitbucket_repo_git_token": "BBDC-MjIxNzQzMDk0OTI4Oo2Ji8Q+n8014redacted",
"bitbucket_repo_name": "test-qa",
"bitbucket_username": "victor.danila",
"bitbucket_host": "http://34.72.91.92:7990",
"lilt_translation_workflow": "MT"
}
```
* Grant **Read** and **Write** permissions.
* Copy the token immediately (it can only be copied once).
* Save the token in the connector configuration.
**Note:** This is separate from the API token and is used for Git operations ONLY. Do not use it for BitBucket API Token configuration.
9. Configure pull request template
**Parameter:** Bitbucket Pull Request Template
**Description:** The title template used for pull requests created by the connector.
**Example:** `[Translation] {language} - {date}`, `Update translations for {target_locale}`
## Configuration example
```
{
"project_prefix": "[QA] BitBucket Server v1",
"target_memories": {
"de-DE": {
"id": 14384
}
},
"lilt_api_key": "redacted",
"fs_export_path_map": {},
"git_delivery_branch_template": "wwtest-new-branch-newwww",
"git_repo_url": "http://34.72.91.92:7990/scm/test/test-qa.git",
"git_source_branch": "main",
"bitbucket_access_token": "BBDC-NTAxMzI0NjkxMDE0Oq9H+QWjb8zFB0redacted",
"bitbucket_pr_template": "test-template",
"bitbucket_project_key": "TEST",
"bitbucket_repo_git_token": "BBDC-MjIxNzQzMDk0OTI4Oo2Ji8Q+n8014redacted",
"bitbucket_repo_name": "test-qa",
"bitbucket_username": "victor.danila",
"bitbucket_host": "http://34.72.91.92:7990",
"lilt_translation_workflow": "MT"
}
```