> ## Documentation Index
> Fetch the complete documentation index at: https://support.lilt.com/llms.txt
> Use this file to discover all available pages before exploring further.
# Single Sign On (SSO) For LILT.com
LILT platform customers can use Single Sign-On (SSO) to sign in using their organization's identity provider. SSO simplifies account management and reduces password fatigue.
**Note:** User accounts must exist in LILT before SSO authentication, unless auto-provisioning is configured (see SAML Setup section).
## Google SSO
LILT platform users can sign in using their Google account.
After receiving an invitation from your organization, you can create an account using Google Sign-On.
If you have an existing LILT account with traditional username/password authentication, you can access it using Google Sign-On with a matching email address. Both sign-in methods work interchangeably.
## OpenID Connect
LILT supports [OpenID Connect (OIDC)](https://openid.net/developers/how-connect-works/) for SSO authentication. OIDC is a modern authentication protocol built on OAuth 2.0 (IETF RFC 6749 and 6750). It provides a standardized way to verify user identity through an Authorization Server and obtain user profile information. OIDC works with many identity providers including Microsoft Entra ID, Okta, and Amazon.
For setup instructions, see the [OIDC Setup](#openid-connect-oidc-setup) section below.
## Microsoft SSO
LILT supports Microsoft authentication for platform customers. Organizations using Active Directory or Azure credentials can use their existing SSO for LILT.
To set up Microsoft SSO, a user from your organization needs to:
1. Log into LILT.com using Microsoft SSO
2. Complete the consent page
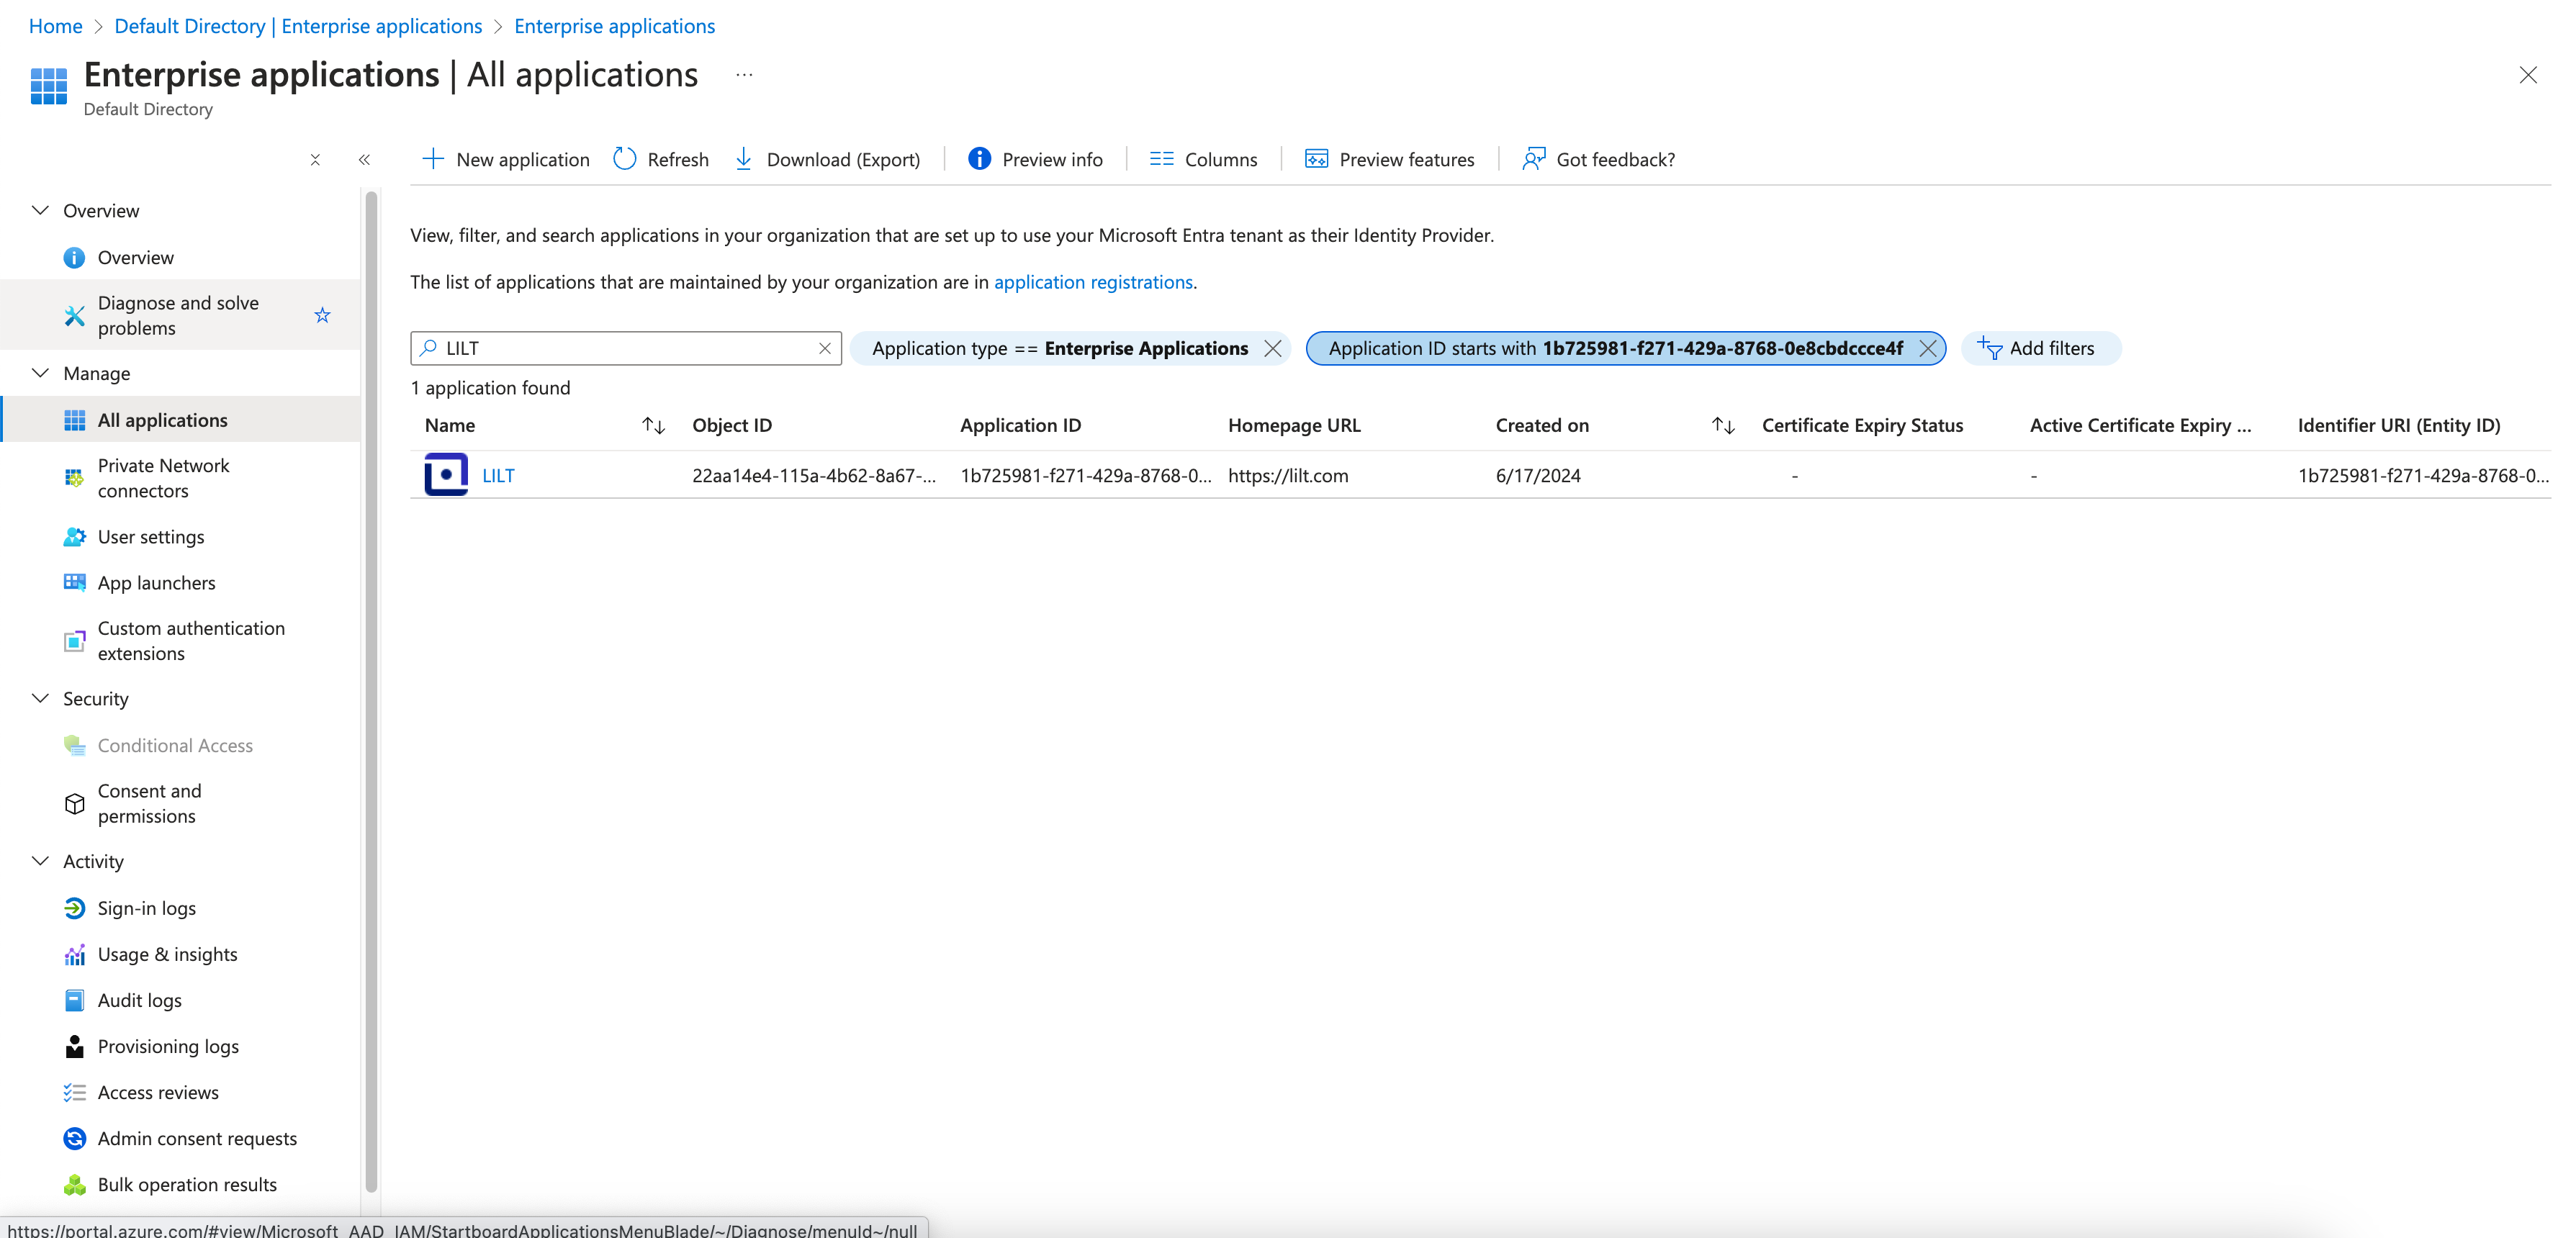
After setup, the SSO app appears under `Enterprise applications` in your Azure Active Directory (AD) or Azure Entra ID, where you can configure access controls.
### Restricting Access
To limit access to specific users:
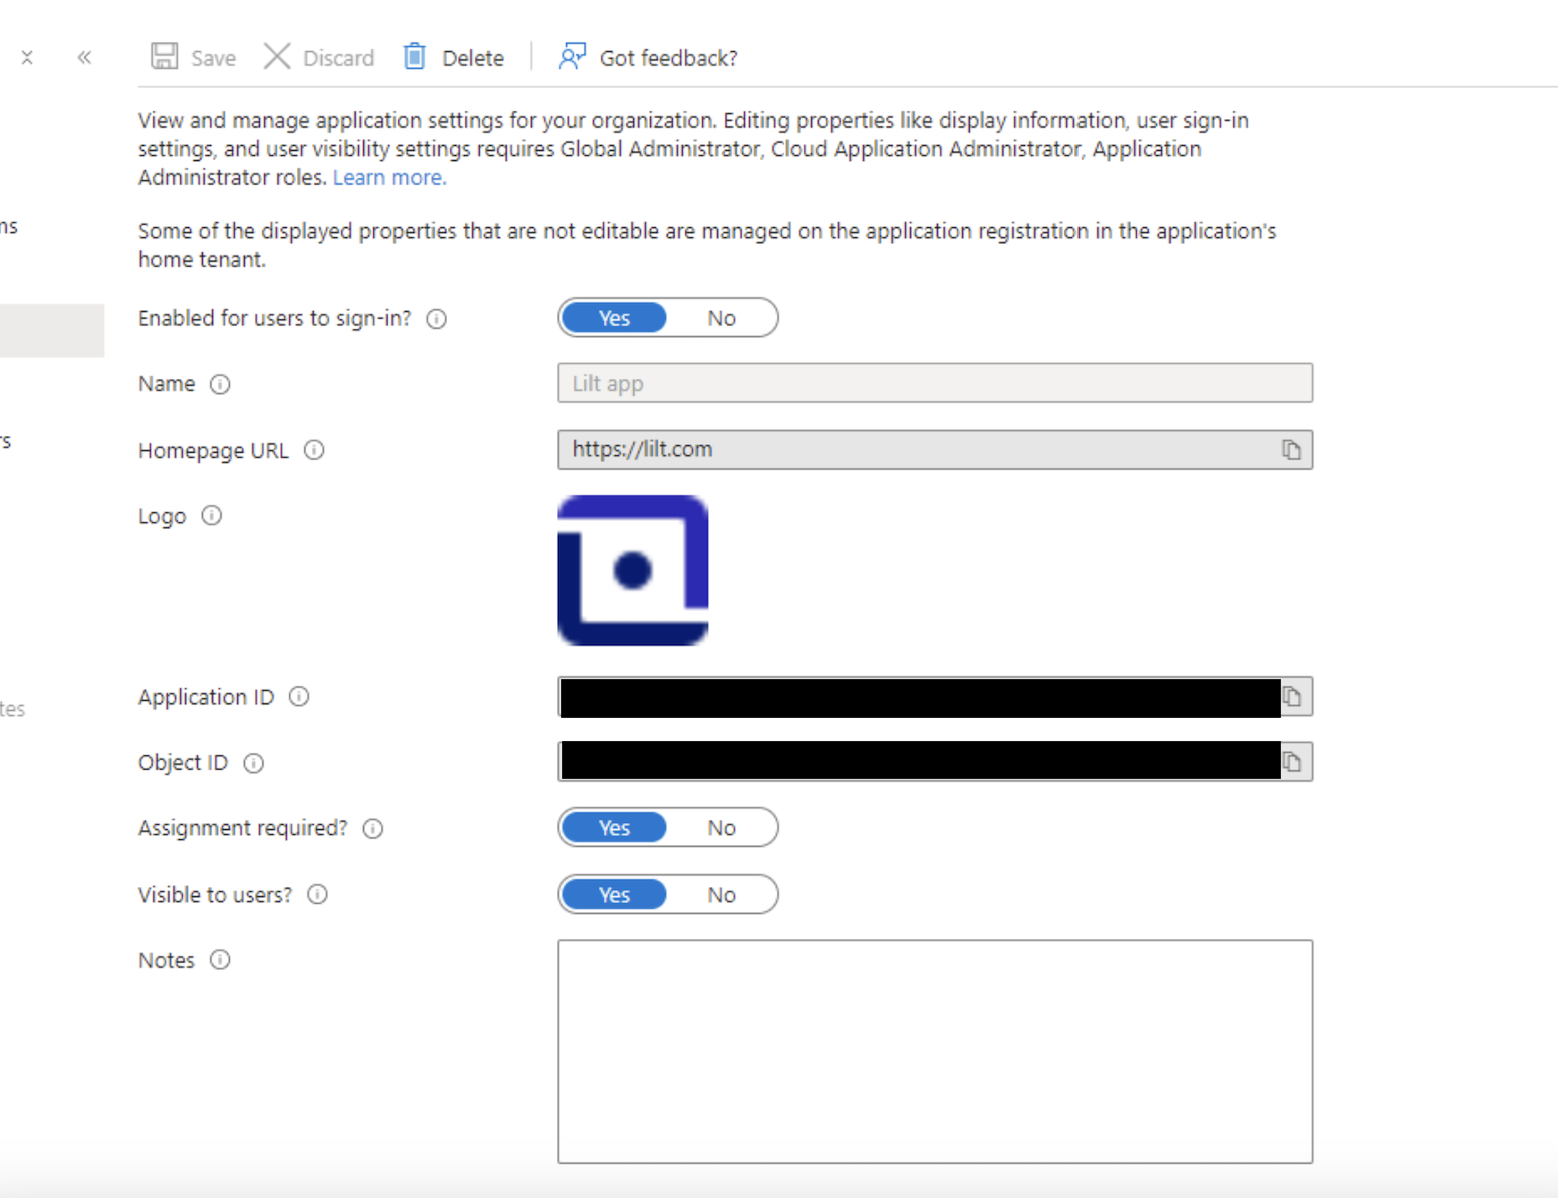
1. Click on the LILT app in Enterprise applications and navigate to **Manage > Properties**
2. Set `Assignment required` to **Yes**
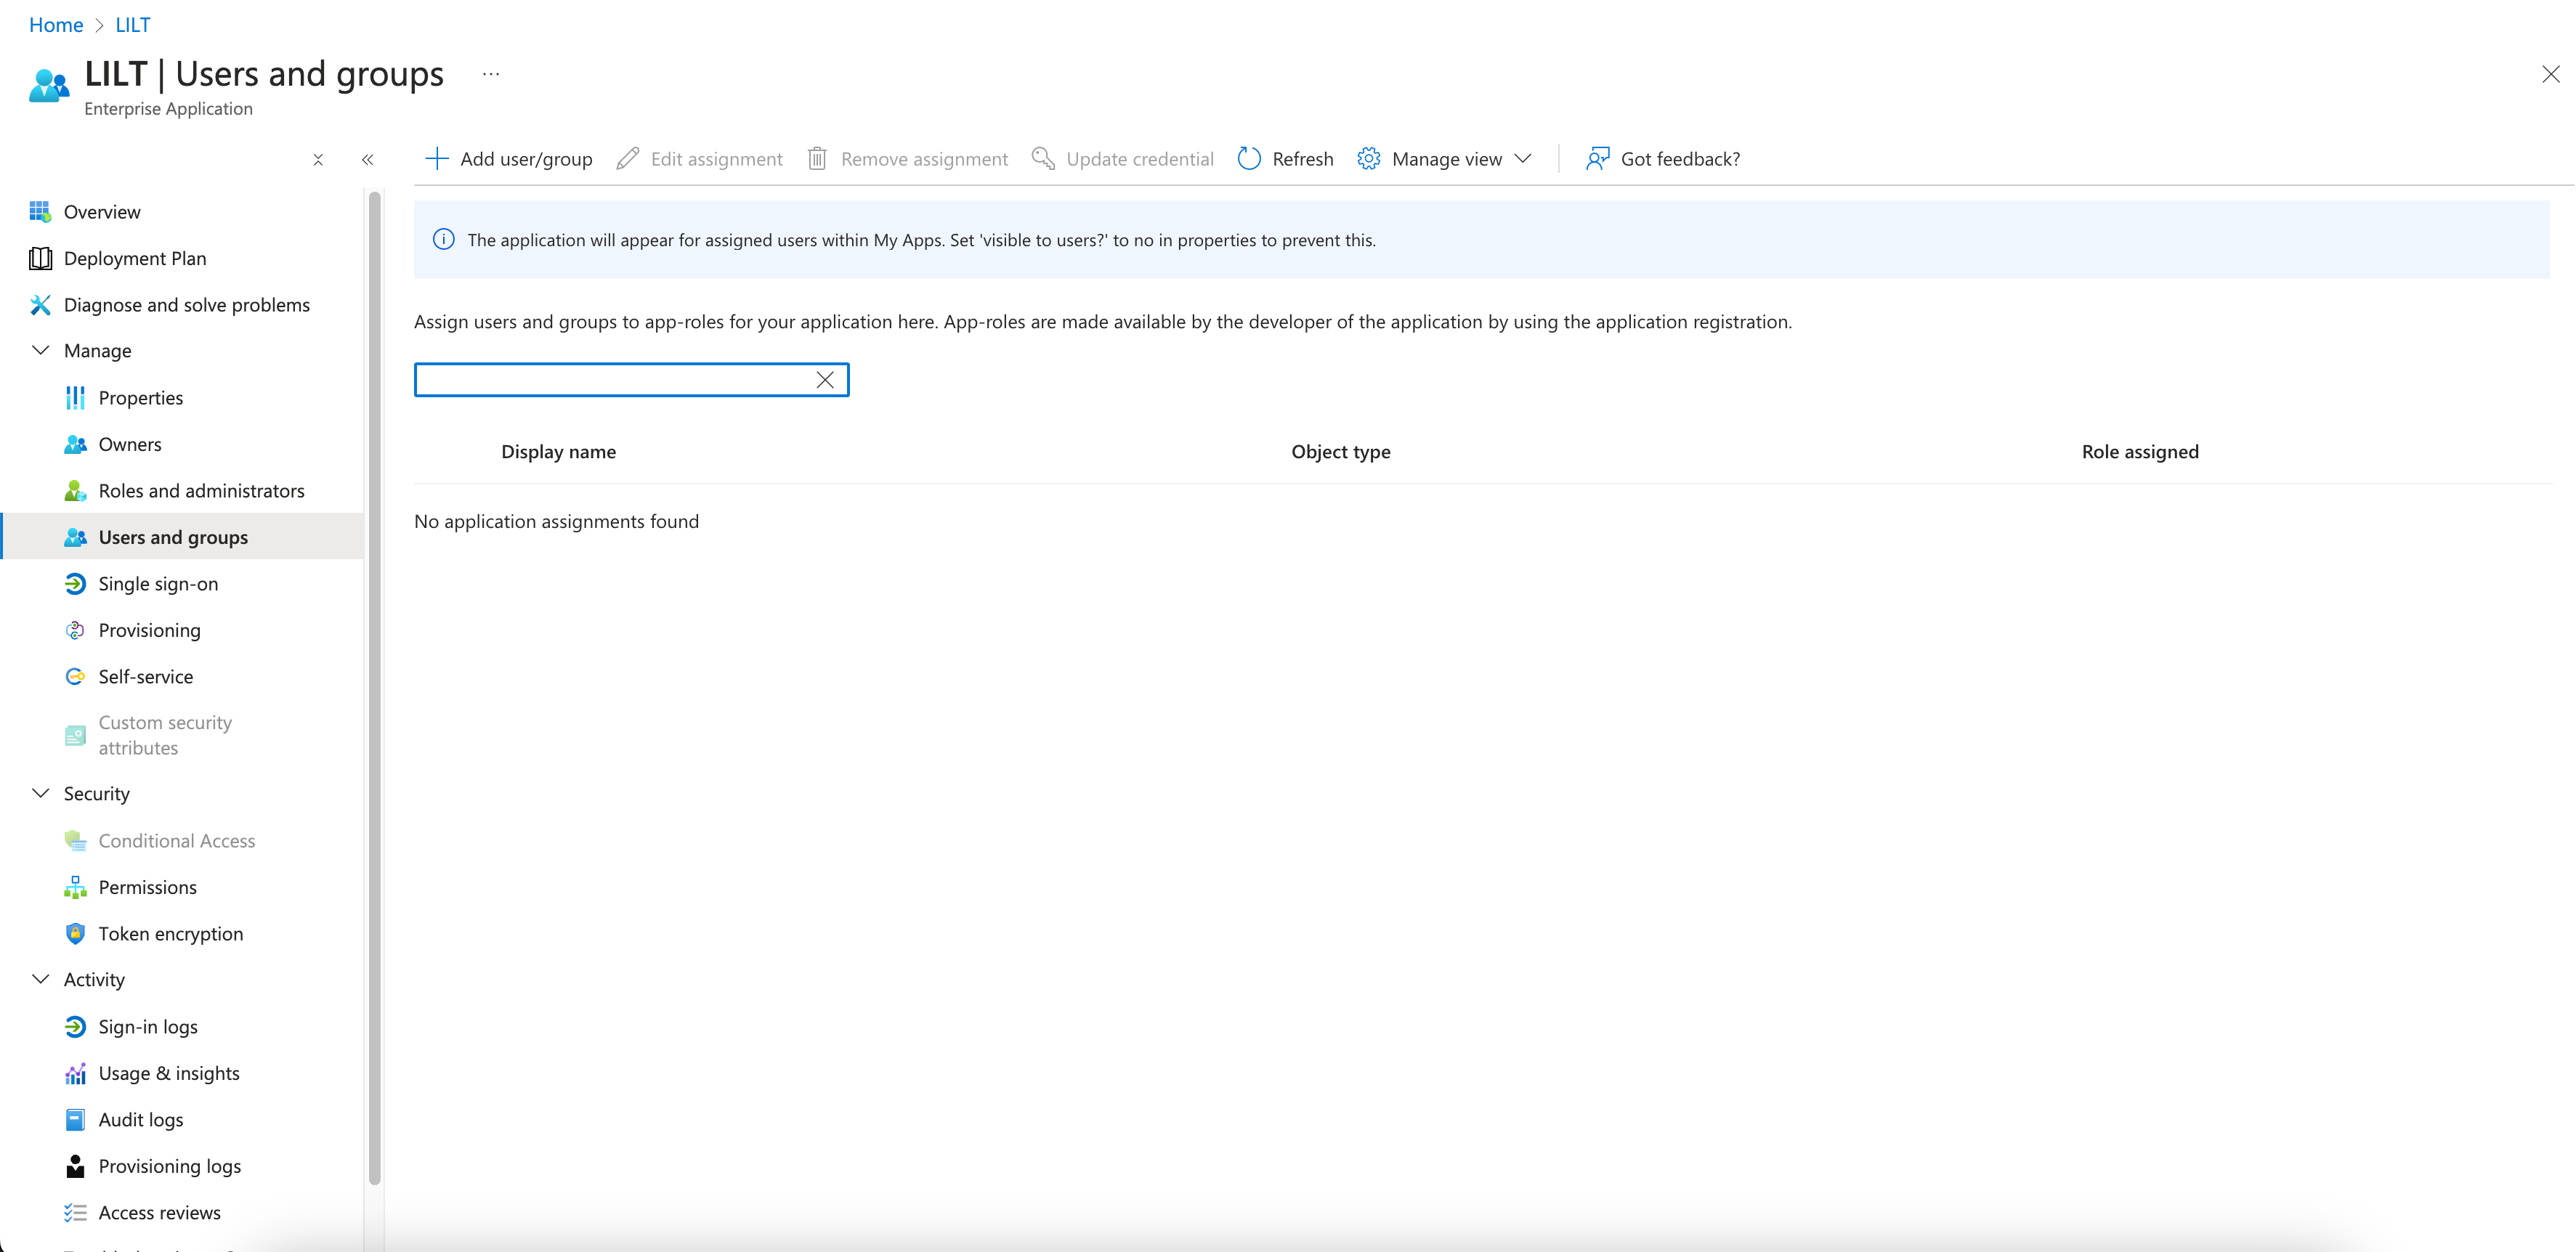
 3. Add users under **Manage > Users and Groups**
* Grant access to entire roles, or
* Add individual users
3. Add users under **Manage > Users and Groups**
* Grant access to entire roles, or
* Add individual users
 ## SAML Setup
To set up a SAML connection with LILT, your organization needs to engage with your LILT customer team. The setup process involves: **LILT Actions**
* LILT creates a new organization configuration with a specific identifier (for example: `customer:okta`)
* You can choose any name in place of `customer:okta`. This acts as a verification piece to ensure you're connecting to the correct configuration.
**Customer Actions**
* Set up SAML configuration on your organization's side and provide the following to LILT:
1. The sign-on URL for your application
2. The entity ID for your application
3. The metadata file for your application
4. The certificate for your application
* New user accounts will be provisioned automatically through just-in-time provisioning when users first log in through SAML
* Configure two custom claims in your organization's identity provider:
#### Required Claims for JIT Provisioning
Both of the following claims are **required** for automatic user provisioning:
* **`lilt_api`** - Your organization's API key for organization identification
* This claim is only required for **new users** being provisioned through JIT. Existing LILT users can authenticate via SSO without this claim.
* To find your API key:
1. Log into lilt.com using a non-SSO admin account
2. Click the gear icon in the lower left corner
3. Navigate to the API tab
4. Copy your API key value
* **Warning:** Do not log into your admin account via SSO, as this will convert it to SSO-only and you will lose access via the regular login page.
1. **Numeric role ID** (e.g., `4`) — matches by role ID
2. **Internal role name** (e.g., `Administrator`, `Manager`) — exact match, case-sensitive
3. **Localized display name** (e.g., `External Linguist`, `Korrektor`, `外部担当者`) — case-insensitive match via alias map
* If `lilt_role` is omitted or does not match any role, the user will be assigned the organization's default role (typically "Customer")
* This can be configured as either:
* An individual user attribute in your IdP, or
* A custom group claim (recommended if most users should have the same role)
* **Important:** This attribute will override any manual role changes in LILT whenever the user logs in via SSO
#### Technical Configuration Details
When setting up your SAML claims, ensure:
* The `emailaddress` claim should **not** have a namespace value configured
* LILT uses email addresses as usernames in the system
* If your IdP's `user.mail` attribute is not consistently populated, you can use `user.userprincipalname` instead (provided it's formatted as an email address)
* The `lilt_role` attribute supports numeric IDs, exact internal names (case-sensitive), and localized display names (case-insensitive)
* We recommend a phased rollout approach, starting with your admin and 5 test users before migrating all users to the new SSO experience
## OpenID Connect (OIDC) Setup
LILT supports OpenID Connect (OIDC) for SSO, providing a modern alternative to SAML. OIDC is built on OAuth 2.0 and uses JSON Web Tokens (JWT), making it simpler to configure with most modern identity providers.
### How It Works
When a user logs in via OIDC SSO:
1. The user is redirected from LILT to your organization's identity provider
2. The user authenticates with the identity provider (password, MFA, etc.)
3. The identity provider returns an ID token containing user claims to LILT
4. LILT uses the claims to identify, provision, and assign roles/domains to the user
### Setting Up OIDC
To set up an OIDC connection with LILT, your organization needs to engage with your LILT customer team.
**Customer Actions**
1. Create an application registration in your identity provider (e.g., an App Registration in Microsoft Entra ID, or an Application in Okta)
2. Provide the following to LILT:
* **Discovery URL** (preferred) — your IdP's `.well-known/openid-configuration` endpoint. This is a single URL that contains all the configuration LILT needs.
* **Client ID** — the application's client identifier
* **Client Secret** — the application's client secret
If your IdP does not support a discovery URL, provide these endpoints individually:
* Authorization endpoint
* Token endpoint
* UserInfo endpoint
* JWKS URI
* End session endpoint
3. Configure the custom claims listed below in your identity provider
4. Ensure the custom claims are included in the **ID token** (not only in the UserInfo response)
**LILT Actions**
* LILT creates a new organization configuration with a specific identifier (for example: `customer-name`)
* LILT configures the connection and provides the **Redirect URI** (callback URL) that you must add to your application's allowed redirect URIs
### Required Claims for OIDC
The same custom claims used for SAML apply to OIDC:
* **`lilt_api`** (required for JIT provisioning) — Your organization's API key for organization identification
* To find your API key: log into lilt.com, click the gear icon, navigate to the API tab, and copy your API key
* Set this as a static claim value — it is the same for all users in the organization
* **`lilt_role`** (recommended) — The user's role within LILT. Accepts three formats:
| Format | Example | Notes |
| :--------------------- | :-------------------- | :--------------------------------- |
| Numeric role ID | `"4"` | Most reliable — never changes |
| Internal role name | `"Agency Translator"` | Case-sensitive, must match exactly |
| Localized display name | `"External Linguist"` | Case-insensitive |
If omitted or unrecognized, the user receives the default role.
* **`lilt_domains`** (optional) — Automatic domain assignment. See the [Set SSO Users' Domains on Account Creation](#set-sso-users-domains-on-account-creation) section below for details.
## **Set SSO Users’ Domains on Account Creation**
Many enterprises have multiple teams using LILT, each with a unique set of needs. To support this, our Domains feature allows administrators to segment their workflows by assigning resources—such as users, models, and preferences—to specific domains. You can read more about this feature under [Domains](https://support.lilt.com/kb/lilt-domains#domains).
This section explains how to configure automatic domain assignment for users via OIDC claims during SSO authentication.
Supported Identity Providers
* WSO2 Identity Server (WSO2 IS)
* Asgardeo
* Any OIDC-compliant identity provider that supports custom claims
### Claim Configuration
To utilize this feature, you must configure the `lilt_domains` claim within your Identity Provider (IdP).
**Claim Name**
`lilt_domains`
**Claim Format**
The claim supports multiple formats to accommodate different user store configurations:
| Format | Example | Description |
| :-------------- | :------------------------ | :------------------------------ |
| Single value | `"Marketing"` | Assign user to one domain |
| Comma-separated | `"Marketing,Sales,Legal"` | Assign user to multiple domains |
| JSON array | `["Marketing", "Sales"]` | Assign user to multiple domains |
| Domain ID | `"123"` | Reference domain by numeric ID |
| Mixed | `"Marketing,456,Sales"` | Combine names and IDs |
**Note:** Leading and trailing whitespace is trimmed from each value. If a domain cannot be found, it is skipped without causing an error — partial matches are allowed.
**Claim Scope**
The `lilt_domains` claim must be included in the **profile** scope (or a custom scope that is requested during the authentication process).
**Identity Provider Setup**
WSO2 Identity Server / Asgardeo
1. Create the claim
1. Navigate to **Claims > Add Local Claim**
2. Claim URI: `http://wso2.org/claims/lilt_domains`
3. Display Name: `LILT Domains`
4. Mapped Attribute: Configure this based on your specific user store
2. Add to OIDC scope
1. Navigate to **OIDC Scopes > profile** (or create a custom scope)
2. Add the `lilt_domains` claim to the scope
3. Map to OIDC claim
1. Navigate to **Claims > Add External Claim**.
2. Dialect: `http://wso2.org/oidc/claim`.
3. External Claim URI: `lilt_domains`.
4. Mapped Local Claim: Select the local claim created in Step 1.
4. Assign values to users
1. Edit user profiles to manually set the `lilt_domains` attribute.
2. Alternatively, configure attribute mapping from your user directory (such as LDAP or AD).
### Domain Resolution
When a user authenticates, LILT resolves domains in the following order:
1. **Numeric values** (e.g., `"123"`) are treated as **domain IDs**.
2. **Non-numeric values** (e.g., `"Marketing"`) are treated as **domain names**.
**Limitation on Purely Numeric Domain Names**: Domains with purely numeric names cannot be assigned via the `lilt_domains` claim. If a domain is named `"123"`, specifying `"123"` in the claim will attempt to find a domain with *ID* 123, not a domain *named* "123".
* **Workaround:** Rename such domains to include at least one non-numeric character (e.g., `"123-dept"` or `"Dept 123"`).
### Behavior
**On User Login** **On First Login (JIT Provisioning)**
When a **new user** is provisioned via SSO with a `lilt_domains` claim:
1. LILT parses the claim value into individual domain identifiers
2. Each identifier is resolved to a domain within the user's organization
3. The user is assigned to all successfully resolved domains
4. Domains that cannot be found are logged but do not cause authentication failure
**Note:** Domain assignments via the `lilt_domains` claim are only applied when a user is first provisioned. Subsequent SSO logins do not update domain assignments. To change domain assignments for existing users, update them directly in LILT.
**Domain Assignment**
* Users are **added** to the specified domains
* Existing domain assignments are preserved
* The claim does not **remove** users from domains not listed
### Related Claims
| Claim | Purpose |
| :------------- | :------------------------------------------------------- |
| `lilt_role` | Assign user to a specific role |
| `lilt_api` | Associate user with an API key (determines organization) |
| `lilt_domains` | Assign user to domains |
## Troubleshooting
### JIT Provisioning Is Not Working
If new users cannot log in or are not being automatically provisioned:
1. **Verify both required claims are configured** in your IdP:
* `lilt_api` must contain your organization's API key
* `lilt_role` must contain a valid role identifier (numeric ID, internal name, or localized display name)
2. **Check for common configuration issues:**
* The `emailaddress` claim should not have a namespace configured
* The `lilt_role` value is case-sensitive and must match exactly
* Ensure users are accessing the SSO login via the SSO button on `/signin`
3. **Confirm existing vs. new user behavior:**
* Existing LILT users can authenticate via SSO even without the `lilt_api` claim
* New users require both `lilt_api` and `lilt_role` claims for JIT provisioning
### Users Are Locked Out After SSO Setup
If admin users lose access to their accounts:
* Admin accounts that log in via SSO are automatically converted to SSO-only
* Once converted, these accounts can only access LILT through the SSO button on `/signin`
* To avoid this, maintain a separate non-SSO admin account for configuration purposes
### Domains Are Not Being Assigned
If users are not being assigned to domains as expected, check the following:
1. **Verify the claim is in the token**
1. Check your IdP's token preview or debug feature
2. Ensure `lilt_domains` appears in the userinfo response
2. **Verify scope configuration**
1. The claim must be included in a scope requested during authentication
2. Typically, this is the `profile` scope
3. **Check domain exists**
1. The domain must exist in the user's organization
2. Domain names are case-sensitive
4. **Check for numeric name conflict**
1. If using a numeric domain name, rename it to include non-numeric characters
### **Logging**
Domain assignment events are logged with the component `embedded-oidc`. Look for the following entries:
* `"embedded-oidc: Domain not found for lilt_domains claim"` Indicates the domain could not be resolved.
* `"embedded-oidc: Assigned user to domains"` Indicates successful assignment
## Frequently Asked Questions
**Is SCIM supported?** Currently, SCIM is not supported. Auto-provisioning is handled through the two custom claims/attributes (`lilt_api` and `lilt_role`) listed in the SAML configuration section. If JIT provisioning is not working:
* Verify both claims are present in your SAML configuration
* Confirm the `lilt_role` value is a valid role identifier (numeric ID, internal name, or localized display name)
* Ensure the `lilt_api` contains your organization's valid API key
**Is SSO a global setting or per user/group?** SSO is configured per user. The LILT platform supports:
* Regular logins via `/signin`
* SSO logins via the SSO button on `/signin`
If a user is configured for SSO and attempts to log in through SSO, then tries to log in as a regular user, the system will deny entry and require SSO login.
For organization-wide SSO implementation, auto-provisioning works as follows:
* If a user doesn't exist in the LILT database, they'll be automatically added when they first log in via SSO
* The user's SAML assertion must include the `lilt_api` claim with your organization's API key (to identify which organization to add them to)
* The user's SAML assertion must include the `lilt_role` claim with a valid role identifier (numeric ID, internal name, or localized display name)
* If either claim is missing or incorrectly configured, JIT provisioning will fail
* Once configured this way, users can only log in via SSO on `/signin`
* Your organization won't need to manually add users to the LILT system
**Does LILT support multiple Azure app connections for SSO for a single domain?** This capability depends on your specific Azure configuration. Each implementation may have unique requirements. Please contact your LILT customer team for guidance on your specific Azure setup.
## See Also
* [WSO2 IS Documentation](https://is.docs.wso2.com/)
* [Asgardeo Documentation](https://wso2.com/asgardeo/docs/)
* [LILT Domains](https://support.lilt.com/kb/lilt-domains)
## SAML Setup
To set up a SAML connection with LILT, your organization needs to engage with your LILT customer team. The setup process involves: **LILT Actions**
* LILT creates a new organization configuration with a specific identifier (for example: `customer:okta`)
* You can choose any name in place of `customer:okta`. This acts as a verification piece to ensure you're connecting to the correct configuration.
**Customer Actions**
* Set up SAML configuration on your organization's side and provide the following to LILT:
1. The sign-on URL for your application
2. The entity ID for your application
3. The metadata file for your application
4. The certificate for your application
* New user accounts will be provisioned automatically through just-in-time provisioning when users first log in through SAML
* Configure two custom claims in your organization's identity provider:
#### Required Claims for JIT Provisioning
Both of the following claims are **required** for automatic user provisioning:
* **`lilt_api`** - Your organization's API key for organization identification
* This claim is only required for **new users** being provisioned through JIT. Existing LILT users can authenticate via SSO without this claim.
* To find your API key:
1. Log into lilt.com using a non-SSO admin account
2. Click the gear icon in the lower left corner
3. Navigate to the API tab
4. Copy your API key value
* **Warning:** Do not log into your admin account via SSO, as this will convert it to SSO-only and you will lose access via the regular login page.
1. **Numeric role ID** (e.g., `4`) — matches by role ID
2. **Internal role name** (e.g., `Administrator`, `Manager`) — exact match, case-sensitive
3. **Localized display name** (e.g., `External Linguist`, `Korrektor`, `外部担当者`) — case-insensitive match via alias map
* If `lilt_role` is omitted or does not match any role, the user will be assigned the organization's default role (typically "Customer")
* This can be configured as either:
* An individual user attribute in your IdP, or
* A custom group claim (recommended if most users should have the same role)
* **Important:** This attribute will override any manual role changes in LILT whenever the user logs in via SSO
#### Technical Configuration Details
When setting up your SAML claims, ensure:
* The `emailaddress` claim should **not** have a namespace value configured
* LILT uses email addresses as usernames in the system
* If your IdP's `user.mail` attribute is not consistently populated, you can use `user.userprincipalname` instead (provided it's formatted as an email address)
* The `lilt_role` attribute supports numeric IDs, exact internal names (case-sensitive), and localized display names (case-insensitive)
* We recommend a phased rollout approach, starting with your admin and 5 test users before migrating all users to the new SSO experience
## OpenID Connect (OIDC) Setup
LILT supports OpenID Connect (OIDC) for SSO, providing a modern alternative to SAML. OIDC is built on OAuth 2.0 and uses JSON Web Tokens (JWT), making it simpler to configure with most modern identity providers.
### How It Works
When a user logs in via OIDC SSO:
1. The user is redirected from LILT to your organization's identity provider
2. The user authenticates with the identity provider (password, MFA, etc.)
3. The identity provider returns an ID token containing user claims to LILT
4. LILT uses the claims to identify, provision, and assign roles/domains to the user
### Setting Up OIDC
To set up an OIDC connection with LILT, your organization needs to engage with your LILT customer team.
**Customer Actions**
1. Create an application registration in your identity provider (e.g., an App Registration in Microsoft Entra ID, or an Application in Okta)
2. Provide the following to LILT:
* **Discovery URL** (preferred) — your IdP's `.well-known/openid-configuration` endpoint. This is a single URL that contains all the configuration LILT needs.
* **Client ID** — the application's client identifier
* **Client Secret** — the application's client secret
If your IdP does not support a discovery URL, provide these endpoints individually:
* Authorization endpoint
* Token endpoint
* UserInfo endpoint
* JWKS URI
* End session endpoint
3. Configure the custom claims listed below in your identity provider
4. Ensure the custom claims are included in the **ID token** (not only in the UserInfo response)
**LILT Actions**
* LILT creates a new organization configuration with a specific identifier (for example: `customer-name`)
* LILT configures the connection and provides the **Redirect URI** (callback URL) that you must add to your application's allowed redirect URIs
### Required Claims for OIDC
The same custom claims used for SAML apply to OIDC:
* **`lilt_api`** (required for JIT provisioning) — Your organization's API key for organization identification
* To find your API key: log into lilt.com, click the gear icon, navigate to the API tab, and copy your API key
* Set this as a static claim value — it is the same for all users in the organization
* **`lilt_role`** (recommended) — The user's role within LILT. Accepts three formats:
| Format | Example | Notes |
| :--------------------- | :-------------------- | :--------------------------------- |
| Numeric role ID | `"4"` | Most reliable — never changes |
| Internal role name | `"Agency Translator"` | Case-sensitive, must match exactly |
| Localized display name | `"External Linguist"` | Case-insensitive |
If omitted or unrecognized, the user receives the default role.
* **`lilt_domains`** (optional) — Automatic domain assignment. See the [Set SSO Users' Domains on Account Creation](#set-sso-users-domains-on-account-creation) section below for details.
## **Set SSO Users’ Domains on Account Creation**
Many enterprises have multiple teams using LILT, each with a unique set of needs. To support this, our Domains feature allows administrators to segment their workflows by assigning resources—such as users, models, and preferences—to specific domains. You can read more about this feature under [Domains](https://support.lilt.com/kb/lilt-domains#domains).
This section explains how to configure automatic domain assignment for users via OIDC claims during SSO authentication.
Supported Identity Providers
* WSO2 Identity Server (WSO2 IS)
* Asgardeo
* Any OIDC-compliant identity provider that supports custom claims
### Claim Configuration
To utilize this feature, you must configure the `lilt_domains` claim within your Identity Provider (IdP).
**Claim Name**
`lilt_domains`
**Claim Format**
The claim supports multiple formats to accommodate different user store configurations:
| Format | Example | Description |
| :-------------- | :------------------------ | :------------------------------ |
| Single value | `"Marketing"` | Assign user to one domain |
| Comma-separated | `"Marketing,Sales,Legal"` | Assign user to multiple domains |
| JSON array | `["Marketing", "Sales"]` | Assign user to multiple domains |
| Domain ID | `"123"` | Reference domain by numeric ID |
| Mixed | `"Marketing,456,Sales"` | Combine names and IDs |
**Note:** Leading and trailing whitespace is trimmed from each value. If a domain cannot be found, it is skipped without causing an error — partial matches are allowed.
**Claim Scope**
The `lilt_domains` claim must be included in the **profile** scope (or a custom scope that is requested during the authentication process).
**Identity Provider Setup**
WSO2 Identity Server / Asgardeo
1. Create the claim
1. Navigate to **Claims > Add Local Claim**
2. Claim URI: `http://wso2.org/claims/lilt_domains`
3. Display Name: `LILT Domains`
4. Mapped Attribute: Configure this based on your specific user store
2. Add to OIDC scope
1. Navigate to **OIDC Scopes > profile** (or create a custom scope)
2. Add the `lilt_domains` claim to the scope
3. Map to OIDC claim
1. Navigate to **Claims > Add External Claim**.
2. Dialect: `http://wso2.org/oidc/claim`.
3. External Claim URI: `lilt_domains`.
4. Mapped Local Claim: Select the local claim created in Step 1.
4. Assign values to users
1. Edit user profiles to manually set the `lilt_domains` attribute.
2. Alternatively, configure attribute mapping from your user directory (such as LDAP or AD).
### Domain Resolution
When a user authenticates, LILT resolves domains in the following order:
1. **Numeric values** (e.g., `"123"`) are treated as **domain IDs**.
2. **Non-numeric values** (e.g., `"Marketing"`) are treated as **domain names**.
**Limitation on Purely Numeric Domain Names**: Domains with purely numeric names cannot be assigned via the `lilt_domains` claim. If a domain is named `"123"`, specifying `"123"` in the claim will attempt to find a domain with *ID* 123, not a domain *named* "123".
* **Workaround:** Rename such domains to include at least one non-numeric character (e.g., `"123-dept"` or `"Dept 123"`).
### Behavior
**On User Login** **On First Login (JIT Provisioning)**
When a **new user** is provisioned via SSO with a `lilt_domains` claim:
1. LILT parses the claim value into individual domain identifiers
2. Each identifier is resolved to a domain within the user's organization
3. The user is assigned to all successfully resolved domains
4. Domains that cannot be found are logged but do not cause authentication failure
**Note:** Domain assignments via the `lilt_domains` claim are only applied when a user is first provisioned. Subsequent SSO logins do not update domain assignments. To change domain assignments for existing users, update them directly in LILT.
**Domain Assignment**
* Users are **added** to the specified domains
* Existing domain assignments are preserved
* The claim does not **remove** users from domains not listed
### Related Claims
| Claim | Purpose |
| :------------- | :------------------------------------------------------- |
| `lilt_role` | Assign user to a specific role |
| `lilt_api` | Associate user with an API key (determines organization) |
| `lilt_domains` | Assign user to domains |
## Troubleshooting
### JIT Provisioning Is Not Working
If new users cannot log in or are not being automatically provisioned:
1. **Verify both required claims are configured** in your IdP:
* `lilt_api` must contain your organization's API key
* `lilt_role` must contain a valid role identifier (numeric ID, internal name, or localized display name)
2. **Check for common configuration issues:**
* The `emailaddress` claim should not have a namespace configured
* The `lilt_role` value is case-sensitive and must match exactly
* Ensure users are accessing the SSO login via the SSO button on `/signin`
3. **Confirm existing vs. new user behavior:**
* Existing LILT users can authenticate via SSO even without the `lilt_api` claim
* New users require both `lilt_api` and `lilt_role` claims for JIT provisioning
### Users Are Locked Out After SSO Setup
If admin users lose access to their accounts:
* Admin accounts that log in via SSO are automatically converted to SSO-only
* Once converted, these accounts can only access LILT through the SSO button on `/signin`
* To avoid this, maintain a separate non-SSO admin account for configuration purposes
### Domains Are Not Being Assigned
If users are not being assigned to domains as expected, check the following:
1. **Verify the claim is in the token**
1. Check your IdP's token preview or debug feature
2. Ensure `lilt_domains` appears in the userinfo response
2. **Verify scope configuration**
1. The claim must be included in a scope requested during authentication
2. Typically, this is the `profile` scope
3. **Check domain exists**
1. The domain must exist in the user's organization
2. Domain names are case-sensitive
4. **Check for numeric name conflict**
1. If using a numeric domain name, rename it to include non-numeric characters
### **Logging**
Domain assignment events are logged with the component `embedded-oidc`. Look for the following entries:
* `"embedded-oidc: Domain not found for lilt_domains claim"` Indicates the domain could not be resolved.
* `"embedded-oidc: Assigned user to domains"` Indicates successful assignment
## Frequently Asked Questions
**Is SCIM supported?** Currently, SCIM is not supported. Auto-provisioning is handled through the two custom claims/attributes (`lilt_api` and `lilt_role`) listed in the SAML configuration section. If JIT provisioning is not working:
* Verify both claims are present in your SAML configuration
* Confirm the `lilt_role` value is a valid role identifier (numeric ID, internal name, or localized display name)
* Ensure the `lilt_api` contains your organization's valid API key
**Is SSO a global setting or per user/group?** SSO is configured per user. The LILT platform supports:
* Regular logins via `/signin`
* SSO logins via the SSO button on `/signin`
If a user is configured for SSO and attempts to log in through SSO, then tries to log in as a regular user, the system will deny entry and require SSO login.
For organization-wide SSO implementation, auto-provisioning works as follows:
* If a user doesn't exist in the LILT database, they'll be automatically added when they first log in via SSO
* The user's SAML assertion must include the `lilt_api` claim with your organization's API key (to identify which organization to add them to)
* The user's SAML assertion must include the `lilt_role` claim with a valid role identifier (numeric ID, internal name, or localized display name)
* If either claim is missing or incorrectly configured, JIT provisioning will fail
* Once configured this way, users can only log in via SSO on `/signin`
* Your organization won't need to manually add users to the LILT system
**Does LILT support multiple Azure app connections for SSO for a single domain?** This capability depends on your specific Azure configuration. Each implementation may have unique requirements. Please contact your LILT customer team for guidance on your specific Azure setup.
## See Also
* [WSO2 IS Documentation](https://is.docs.wso2.com/)
* [Asgardeo Documentation](https://wso2.com/asgardeo/docs/)
* [LILT Domains](https://support.lilt.com/kb/lilt-domains)