MongoDB
Workaround Steps
The steps listed in this Workaround Steps section have been fixed in the release coming out in April, so this workaround is not needed if you have installed the April release. The currently shipped MongoDB chart needs to be edited to support connection to the mongo database. This can be done by starting from the install_dir/charts directory and following the steps below: Extract the mongo chart like:- Edit the *MONGODB_CLIENT_EXTRA_FLAGS *value in *templates/standalone/dep-sts.yaml *to include –tlsAllowInvalidHostNames. The resulting value will look like the image shown below:
-

- Save the file.
- From the install_dir/install_scripts directory, run below command which will reinstall mongodb with the connectivity set up.
Connecting within the Cluster
In order to connect within the cluster, you can run the following commands: Connect to the pod in the cluster:Connecting from outside the Cluster
Caveat
We currently have to specifically allow invalidHostNames for mongodb to allow TLS connection from outside the cluster. We are in the process of testing certificates created and passed with TLS so that we can remove this flag. This flag can be passed when using the mongosh client from outside the cluster but may not be supported from other clients unless they have a similar flag. We will provide an update on a solution for this soon.Steps
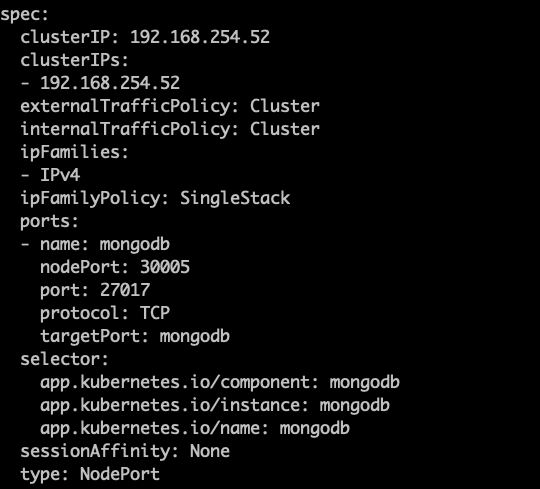
Connecting from outside the cluster is similar from connecting within the cluster except for the changes listed below: Edit the mongodb service so that it runs as a NodePort type of Kubernetes service that can be accessed from outside the cluster. You can run this command to do that:-
In the resulting file that opens, change the type field of the service from ClusterIP to NodePort. Also, under the ports section, add a new field for nodePort. Please use a 5 digit value above 30000 for nodePort value to prevent port conflicts. See the example below:
-
- Save the file and exit. This will automatically redeploy the service and expose it as a nodePort service. You can describe the service to confirm that its type is now NodePort using:
-
Setting up certificates for authentication. Authenticating requires passing certificate files which can currently be retrieved from the mongodb pod as shown below:
- mongodb.pem: Exec into the pod as described above and save the contents of the /certs/mongodb.pem file into a local file that we will refer to as mongodb.pem below.
- Save the contents of the */certs/mongodb-ca-cert *file into a local file that we will refer to as ca-file below.
- With the service type setup and cert files available locally, you should be able to connect to the mongodb service from any machine that has connectivity to the cluster’s node worker’s IP address using the command: