

Supported Content Types
Assets Metadata and DAM Asset Content are different things. Assets Metadata translates the JCR properties attached to an asset (title, description, etc.). DAM Asset Content translates the binary file itself (
.docx, .xlsx, .pptx, .txt, .html) and is configured on a dedicated DAM Asset Content repository.Installation
Installation methods depend on your AEM environment. In both cases, contact your LILT account team to obtain the connector package and the appropriate version for your environment.Check with your LILT account team for the latest connector version.
AEM as a Cloud Service
For AEMaaCS, the connector package must be deployed through your source code repository. AEM Cloud Service only allows one repository to be deployed at a time, so the LILT connector package must be embedded into your project’sall package.
There are two deployment options:
Option 1: Maven Dependency
This method links your AEM project to the LILT connector repository via Maven. At a high level:
- Create a GitHub Personal Access Token with
repoandwrite:packagesscopes. - Add a Maven settings file (
.cloudmanager/maven/settings.xml) with your GitHub credentials. - Add the LILT connector repository and dependency to your root
pom.xml. - Add the dependency and embedded package configuration to your
all/pom.xml. - Deploy via Cloud Manager.
- Obtain the connector
.zipfile from your LILT account team. - Create a
local-repodirectory in your AEM project and copy the package there. - Add a local repository reference to your root
pom.xml. - Add the dependency and embedded package configuration to your
all/pom.xml. - Commit the
local-repodirectory and deploy via Cloud Manager.
AEM 6.5 (On-Premise)
For AEM 6.5, there are two installation methods: Option 1: Manual Package Upload (Quick Setup)- Obtain the connector
.zipfile (e.g.,lilt-connector.all-<version>-6.5.zip) from your LILT account team. - Log into your AEM Author instance and navigate to Tools > Deployment > Packages (or access Package Manager directly at
http://<your-aem-host>:<port>/crx/packmgr/index.jsp). - Click Upload Package, select the
.zipfile, and click OK. - Locate the uploaded package in the list and click Install.
- Keep the default installation settings and click Install to confirm.
The connector package installs 4 components. Verify all 4 are successfully installed. If upgrading, uninstall the previous version before uploading the new package.
- Use the
-6.5version classifier (e.g.,1.5.0-6.5instead of1.5.0-cloud). - In
all/pom.xml, use<subpackages>instead of<embeddeds>in thefilevault-package-maven-pluginconfiguration.
Verifying Installation
After installation completes on either environment:- Check that the package status shows as Installed in Package Manager.
- Navigate to the AEM Apps view.
- Verify that the Lilt Translations app appears in the apps list.
Configuration
After installing the connector, you must complete configuration on both the LILT side (Connectors Builder) and the AEM side (Lilt Translations app) before you can submit content for translation.Access Required
To be able to access and configure the connector, users need read and write permissions to all locations under /etc/lilt-connector.Step 1: Set Up the Connector in Connectors Builder
The AEM connector must be configured with support from LILT’s technical support team using Connectors Admin and Connectors Builder — not through the AEM UI alone.
- Have your LILT technical point-of-contact generate a new API token for this connector in connectors admin and save it — you’ll need it for the AEM configuration.
- Give your LILT technical point-of-contact the list of languages (and models/data sources if applicable) you would like to use for translation. They will configure these in your LILT Connectors Builder.
Step 2: Access the Lilt Translations App
- Open your AEM instance.
- Navigate to the AEM Apps view.
- Click on the Lilt Translations app.
Step 3: Configure General Settings
Navigate to Configurations > General and enter the following:
You will also need to configure the Translate Assets setting, which controls how images, documents, and other digital assets are handled during translation. This setting applies to JCR Properties repositories only — it has no effect on DAM Asset Content repositories, where the file itself is always the translated output.
- Clone asset to target language: Creates a separate copy of each asset for every target language. Use this if you need different asset versions per language.
Step 4: External Locale Mapping
Relevant for tag translation only. Some AEM instances expect language codes that differ from the codes LILT uses (for example, LILTno-NO maps to AEM nb_NO). Add any such discrepancies to the External Locale Mapping field so translated content is written back under the code AEM expects. This is a global setting that applies to all submissions. Compare the codes before translating into a new language, especially Norwegian and Chinese.
Step 5: Configure Proxy Settings (Optional)
If your organization requires outgoing traffic to go through a proxy server, navigate to Configurations > Proxy and enter the proxy host, port, and credentials. Enable the proxy toggle to activate it. Most users can leave this section blank.Step 6: Configure Auto-Archiving (Optional)
Navigate to Configurations > Auto-Archiving to automatically archive old or completed translation jobs. You can set the frequency (Never, Weekly, or Monthly) and choose which job statuses should be archived (e.g., Completed, Failed, Canceled). This is especially helpful for teams with a high volume of translation jobs.Step 7: Configure Functionality
Depending on the version of AEM you are currently running, you will have access to a functionality tab which modifies the default views and functionalities available in repositories and job submission.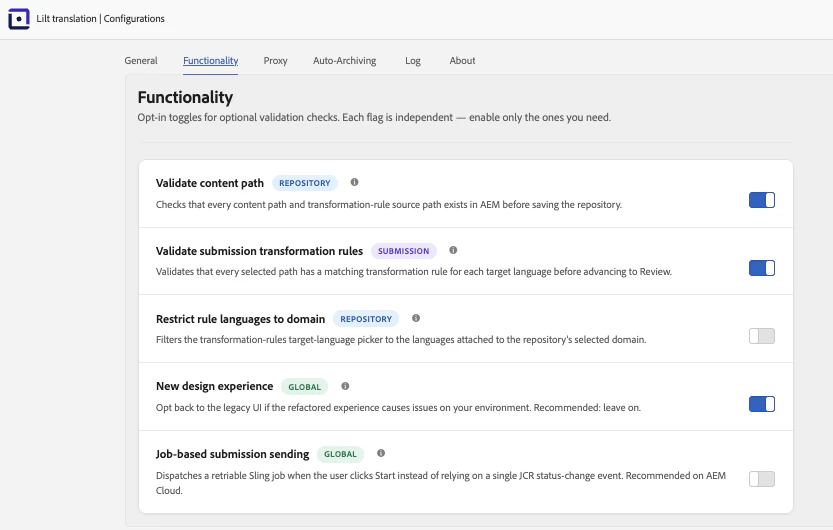
Create a Repository
A repository defines which content in AEM is available for translation and how it should be processed. You must create at least one repository before you can submit content for translation. Navigate to Repositories and click Create New Repository.Access Required
To be able to access and configure the connector, users need read and write permissions to all locations under /etc/lilt-connector. To submit only, the following access is required.Basics
- Content Type: Determines how the repository translates content — JCR Properties (default; pages, content fragments, and properties/metadata) or DAM Asset Content (binary document files). This is locked after the repository is created and cannot be changed later. See Translating DAM Asset Content.
To translate tags on their own, point a JCR Properties repository at a
cq:tagspath (the root or a specific namespace). Onlyjcr:titleandjcr:descriptionare translated for tags, regardless of the repository’s configured properties, and transformation and link rewrite rules do not apply. See Translating Tags. - Name: A friendly name for your repository (e.g., “Main Site”).
- Path: The root path in AEM where translatable content lives (e.g.,
/content/wknd). Only content under this path will be available for translation through this repository. For DAM Asset Content repositories, this path is constrained to/content/dam. - Default Submission Status: The initial status for new submissions —
NOT_READY(requires review before sending) orREADY(can be sent immediately). - Submission Name Pattern: A template for how submission names are generated (see Submission Pattern Name below).
- Deliver to Launch default (v1.10+, AEM as a Cloud Service). For repositories translating Sites pages and Content Fragments, you can set a default for Deliver to Launch at the repository level. Authors can override the default on individual submissions. This setting has no effect on DAM Asset Content repositories, which cannot deliver to Launches.
- Nested Fragment Filtering (JCR Properties, v1.13+ Cloud only) — Optional allow-list or deny-list of paths that limits which nested content fragments are discovered when Translate nested content fragments is enabled. Leave empty to include all nested fragments.
Translation Rules
Transformation Rules define how source content paths and languages map to target locations. These paths are case sensitive. Each rule maps a source path to a target language and target path:Transformation Rule Validation
Starting with AEM Cloud connector version 1.7.0, the connector can validate your transformation rules at key points in the workflow — when saving a repository and when starting a submission — so configuration issues are caught before content is sent for translation. To enable this functionality, you will need to toggle on the following functionalities in the configurations modal.- Validate submission transformation rules
- Validate content path
- Restrict rule languages to domain
- New design experience
What Gets Validated
- When saving a repository, the connector checks that your transformation rules are well-formed and that source paths map to valid target language and path combinations.
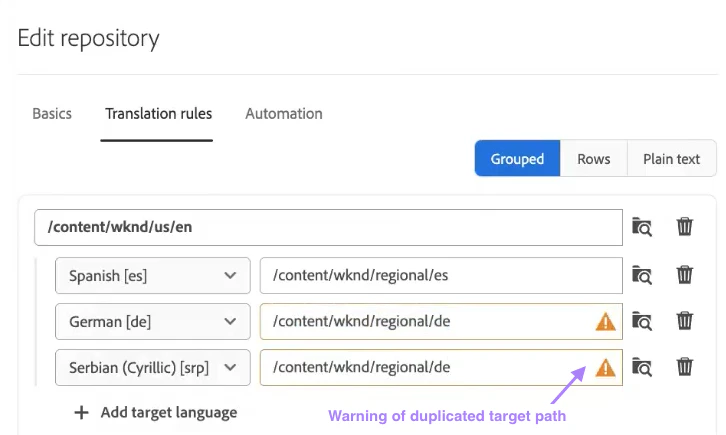
- When starting a submission, the connector checks that every content path in the submission has a matching transformation rule for each selected target language. If a target language is missing a rule, the connector will flag the issue and suggest how to resolve it — for example, by adding the missing language mapping to your repository’s transformation rules.
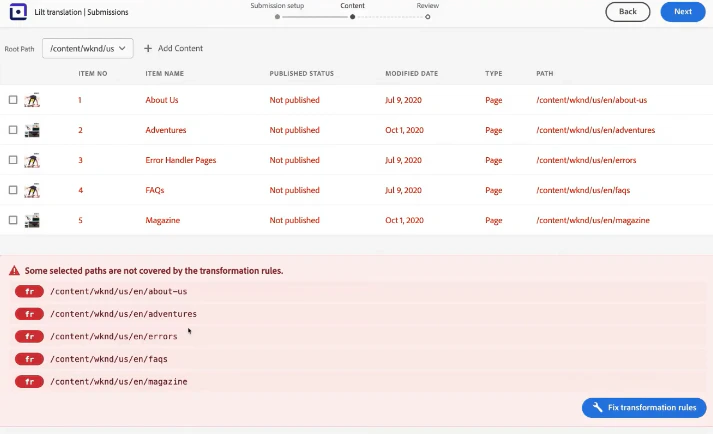
- When starting a submission, the connector checks that every content path in the submission has a matching transformation rule for each selected target language. If a target language is missing a rule, the connector will flag the issue and suggest how to resolve it — for example, by adding the missing language mapping to your repository’s transformation rules.
Redesigned Transformation Rules Editor
Alongside validation, cloud version 1.7.0 includes a redesigned transformation rules editor in the repository configuration. The new editor provides a clearer view of your source-to-target path mappings, making it easier to spot gaps and configure rules correctly.Disabling Validation
If your setup uses custom content structures that don’t follow standard path conventions, you can disable path validation in the ‘Configurations> Functionality’. In most cases, we recommend keeping validation enabled.Link Rewriting Rules (optional) control how internal links are rewritten during translation to point to the correct target-language pages:
jcr:title, jcr:description, etc.) should be included for translation. You can also set optional character limits:
On DAM Asset Content repositories, Link Rewriting Rules, Translate Properties, and Translate Content Fragment Variations are hidden, because they only apply to property-based content. Transformation Rules still apply and determine where translated files are delivered.
Automation (Optional)
If you want translation submissions to be created automatically on a schedule, configure the automation time, frequency (daily or weekly), and other submission parameters. Select “Don’t send automatically” to disable this feature.Automation is not available for DAM Asset Content repositories or tags as a standalone content type — the Automation tab is hidden for them and they must be started manually, even when the default submission status is
READY.Submitting Content for Translation
Once configuration is complete, you can create translation submissions from the Lilt Translations app in AEM.Creating a Submission
Navigate to Submissions and click Create New Submission. The submission wizard has three steps: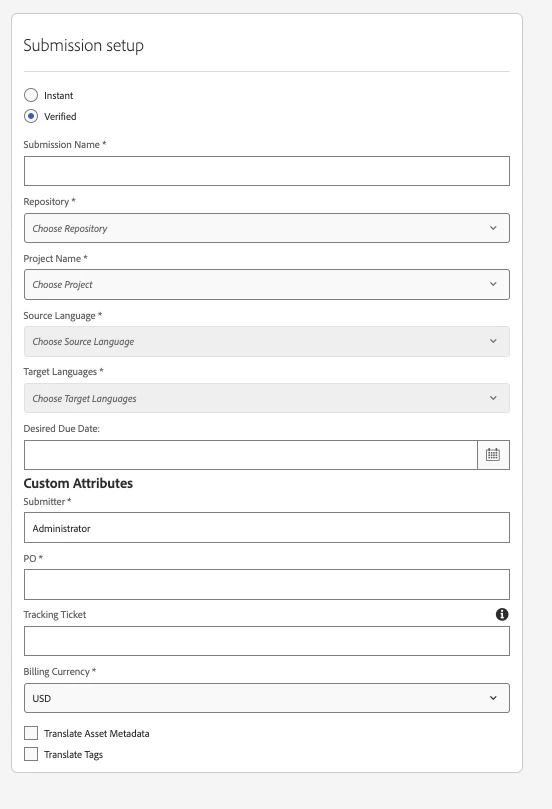
- Submission Name: A name to identify this submission in the list.
- Repository: Select which repository to use (determines available content and rules).
- Project Name: Select the domain from your LILT organization.
- Source Language: The language of the original content (filtered by the selected domain).
- Target Languages: One or more languages to translate into (filtered by domain and source language with Cloud 1.7).
- Due Date (optional): Set a deadline for the translation.
- Purchase Order / JIRA Ticket (optional): Add tracking or billing information.
- Choose whether to translate assets and referenced tags alongside pages. Referenced tags are the tags attached to the pages in this submission. To translate tags on their own, see Translating Tags.
- These options apply to JCR Properties repositories. On DAM Asset Content repositories, the Translate Asset Metadata and Translate Tags options are hidden, since only the file itself is translated, and the content picker is rooted under
/content/damand limited to supported file types.
- These options apply to JCR Properties repositories. On DAM Asset Content repositories, the Translate Asset Metadata and Translate Tags options are hidden, since only the file itself is translated, and the content picker is rooted under
- Choose whether or not you want to include nested content fragments.
- If your repository supports it, a Deliver to Launch option appears on this step. Set it before selecting content; it applies to the whole submission. It defaults to the repository’s configured value and can be overridden here per submission.
- Content Paths: Choose the path(s) to send for translation.
- Include Children (optional): Include all subpages under the chosen path, so you can translate an entire section at once.
- For tag folders, “Include Children” does not apply — selecting a tag folder automatically includes every tag within it.
- Review all selections — job details, content, and settings.
- Go back to previous steps if changes are needed.
- When Deliver to Launch is on, the Review step shows the date-based Launch folder that will be created (
/content/launches/YYYY/MM/DD/<launch-name>/…) so you can confirm the destination before submitting. - Click Save Submission to create the submission.
Starting a Submission
After saving, the submission appears in the submissions list. To send it for translation:- Click the submission to view its details.
- Review the selected content, languages, and settings.
- Click Start Submission to send the job to LILT.
- The status will update as the job progresses:
SENDING→IN_PROGRESS→COMPLETE.
Importing Translated Content
Once the translation is complete, import the results back into AEM:- When the submission status shows Import Complete, the Reimport Content button becomes available in the submission detail view.
- Click Reimport Content to bring the translated pages, assets, and tags into your AEM instance.
- The connector places translations according to your repository’s transformation rules.
Submission Pattern Name
When you create or edit a repository, you can create or modify the naming conventions of the submission name. You can add the following variables to the submission name, making sure they are surrounded by curly brackets:- today — Today’s date, formatted as YYYY-MM-DD.
- filename — The name of the current file being uploaded.
- project_prefix — The
project_prefixvalue provided in the configuration. - project_name — The
project_namevalue assigned to the file in the code. - connector_id — The Connector ID.
- connector_type — The Connector Type (e.g., “aem”).
- path_names[index] — Specifies the name of the directory at the given level above the file being uploaded. The index corresponds to the directory level, starting from 0 for the file itself. For example, given the filename
en-US/fr-FR/file.txtand the template optionpath_names[2], the result will been-US, as it is the second-level parent directory above the file.
Deliver to Launch (v1.10+)
By default the connector writes returning translations straight to the live target page. Deliver to Launch instead routes them into an AEM Launch — a synced, staging copy of the content — so your team can review the translation and promote it to the live page manually. The live page is never touched until you promote the Launch. This is useful when a page may be edited during the translation cycle: because the translation returns into the Launch rather than the live path, in-flight edits to the live page are never overwritten. Availability- AEM as a Cloud Service only.
- Sites pages, Experience Fragments and Content Fragments. Not available for DAM assets.
- Per submission: On the submission Setup step, toggle Deliver to Launch on before selecting content. The setting applies to the whole submission.
- Repository default: Administrators can set a default for Deliver to Launch in the repository configuration (see Repository configuration below). Authors can override the default on any individual submission.
- Creates the AEM Launch and the per-language paths at submission time — you don’t need to pre-build Launches or target-language paths.
- Creates one Launch per page per language (languages are not bundled into a single Launch).
- Uses date-based Launch paths:
/content/launches/YYYY/MM/DD/<launch-name>/…. The assigned Launch folder is shown on the Review step before you submit.
- Both the initial delivery and any reimport write into the Launch, not the live path.
- Reimporting overwrites the existing content in that Launch. If the expected Launch folder already exists, the connector reuses it; otherwise it creates it.
- Promotion is a manual, native AEM action. The connector does not promote or auto-promote. Review the content in the Launch, then promote the Launch to live using standard AEM authoring when you’re ready. Publish as normal after that.
- A submission keeps whichever Launch option it was created with. Changing the repository default later does not change in-flight submissions (including their reimports) — only new submissions.
- If the live target-language page does not yet exist, that content delivers to the live path even with Deliver to Launch on, because there is no existing live content to protect.
- Content Fragments: adding Content Fragments to Launches can cause version-control issues, particularly with fragments that reference other fragments or assets. This is a known behavior of AEM Launches, not of the connector, so take care when using Launch delivery for heavily-referenced Content Fragments.
- When Deliver to Launch is enabled for a submission, the submissions table shows this per submission. The indicator is a button that opens the full list of Launch paths the submission uses.
Translating DAM Asset Content
Starting with AEM Cloud connector version 1.8, the connector can translate assets stored in the AEM Digital Asset Manager (DAM) — Word, Excel, PowerPoint, plain text, and HTML files — by sending the original file to LILT and writing the translated file back into AEM. This is a separate pipeline from the standard page/property translation flow. It is intended for customers who want to translate document assets directly, rather than pages, content fragments, or asset metadata.DAM Asset Content translation is configured at the repository level using a new Content Type setting. A single repository is either a JCR Properties repository (the existing flow) or a DAM Asset Content repository — not both.
Supported File Types
DAM Asset Content repositories support the following binary file types:
The content path picker only allows selection of these supported file types. Other asset types (images, PDFs, etc.) are not selectable in a DAM Asset Content submission.
Setting the Content Type on a Repository
When you create a repository, the repository wizard now includes a Content Type field with two options:- JCR Properties (default) — the existing page, content fragment, and property-based translation pipeline.
- DAM Asset Content — the new pipeline for translating document assets.
The Content Type is locked after the repository is created and cannot be changed when editing the repository. If you need to switch a repository between modes, create a new repository with the desired Content Type.
- The repository path is constrained to
/content/dam— only assets under the DAM root can be translated. - The Automation tab is hidden. Scheduled/automatic submissions are not supported for this mode (see note below).
- Link Rewriting Rules, Translate Properties, and Translate Content Fragment Variations are hidden, because these only apply to property-based content and have no effect on these files.
source > lang:target format).
Scheduled submissions (Automation) are not available for DAM Asset Content repositories. On AEM as a Cloud Service this mode relies on Sling jobs, so submissions must always be started manually — even for repositories with a default status of READY.
Global “Translate Assets” Setting
The global Translate Assets option under Configurations → General applies to JCR Properties repositories only. It has no effect on DAM Asset Content repositories, where the file itself is always the translated content.Submitting DAM Asset Content for Translation
Creating a submission from a DAM Asset Content repository follows the same overall flow as a standard submission, with a few differences:- DAM Asset Content repositories are clearly flagged in the repository picker so you can tell them apart from JCR Properties repositories.
- The content path picker is rooted under
/content/damand only shows the supported file types listed above. - The Translate Asset Metadata and Translate Tags options are hidden, because these are JCR-only features. For DAM Asset Content, only the file is sent — no metadata, tags, or properties are translated.
How Translated Files Are Imported
When a DAM Asset Content job is complete, the connector imports the translated files back into AEM:- If the target asset does not already exist, the connector deep-copies the source asset to the target path, preserving metadata and rendition structure.
- It then replaces only the original file content of the asset with the translated version.
- It triggers full asset reprocessing so that PDF previews, thumbnails, and other web renditions are regenerated to reflect the translated content.
source > lang:target format).
After import, the file content is translated immediately, but AEM regenerates its renditions (the thumbnail and preview representations AEM uses to display an asset) asynchronously. This reprocessing can take a few minutes. If the preview or PDF viewer still shows the source language right after import, it is usually just the rendition being regenerated — the underlying file is already translated.
Updating or Redelivering a File
If the source asset changes after a translation has been delivered, create a new submission for the updated file. The new delivery replaces the previous translated file at the target path; the connector does not keep the prior delivery, since the source it was based on has changed.Translating Tags
Starting with AEM Cloud connector version 1.12, the connector can translate tags as a standalone submission — with no page or content fragment required.Standalone tag translation is available on AEM as a Cloud Service (AEMaaCS) only.
/content/cq:tags/properties/style. The node path is a stable identifier that never changes; what gets translated is the tag’s title (jcr:title) and, optionally, its description (jcr:description). Tags are grouped into namespaces (the top folder under /content/cq:tags) and can nest into child tags.
Previously, tags could be translated only as part of a page submission — by checking Translate Referenced Tags in Job Setup, which bundles the tags attached to the selected pages into that job. You can now point a repository at a tag location and submit tags directly, independent of any page.
Setting Up a Repository for Tags
Add acq:tags path — either the root (/content/cq:tags) or a specific namespace (for example, /content/cq:tags/properties) — to a JCR Properties repository. The repository can be an existing one that already has site content paths, or a dedicated one for tags. Tag folders and namespaces under that path become selectable as submission content.
For tags, only
jcr:title and jcr:description are translated, regardless of the properties configured on the repository. Transformation and link rewrite rules do not apply to tag content.External Locale Mapping
Tag localization can surface a mismatch between the language codes LILT uses and the codes AEM expects (for example, LILTno-NO maps to AEM nb_NO). Before translating tags into a new language — Norwegian and Chinese are common cases — compare the codes and add any discrepancies to the External Locale Mapping field in the connector configuration. This is a global setting that applies across submissions. See Configure General Settings.
Submitting Tags for Translation
Tag submissions use the same three-step submission wizard as other content:1
Job Setup
Select the tag-configured repository. Standard job fields apply: submission name, source language, target languages, due date, and PO/JIRA tracking. You do not need to check Translate Referenced Tags to submit standalone tags.
2
Content Selection
Select a tag folder or individual tags. Selecting a tag folder automatically includes every tag in it — there is no separate “Include Children” step as there is for pages. You can also add pages to the same submission; those pages will include their referenced tags only if you checked Translate Referenced Tags in Job Setup.
3
Review
Review your selections and start the submission. All tags in the submission are combined into a single JSON file and sent to LILT.
How Translated Tags Are Imported
Translated tags are written back as locale-suffixed properties on the same tag node (jcr:title.de, jcr:title.fr, and so on). No new tag paths are created and the tag ID stays stable — this is Adobe’s recommended localization pattern and keeps a single source of truth per tag. Import writes or overwrites the locale-specific property for each delivered language.
Limitations
- AEMaaCS only. Tag translation is not available on AEM 6.5 (on-premise).
- Tags must be within a configured tag path. Tags outside the configured
cq:tagsroot are not selectable. - No scheduled or automated tag submissions. Tag jobs are started manually. When a tag folder is selected, the automation option is greyed out.
- Only
jcr:titleandjcr:descriptionare translated. Custom tag properties are not supported. - Tag IDs and node paths are never changed. Only the title and description are translated; the tag’s identity stays stable.
- No scheduled or automated tag submissions. Tag jobs are started manually.
- No separate per-language tag trees. Translations live on the same node.
Translating Nested Content Fragments
Available in v1.9+. This option automatically discovers and includes referenced content fragments when you create a submission. To use it, check Translate nested content fragments in the Job Setup step of the submission wizard. When enabled:- Select a Sites page or parent content fragment as usual in the Content step.
- If the repository has a nested fragment filter configured, only fragments that pass the filter are added. See Filtering nested content fragments by path.
- Discovered fragments appear in the content table grouped under the item that references them, so you can see which fragments were pulled in from which path.
- Removing a seed path also removes its auto-discovered nested fragments.
Filtering nested content fragments by path
Available in v1.13+ for AEM as a Cloud Service. By default, nested discovery includes every referenced fragment within the max depth. If some referenced content should not be translated — shared or global components, boilerplate, or fragments owned by another team — you can filter nested discovery by path at the repository level. Setting up a filter Open the JCR Properties repository configuration and find the Nested Fragment Filtering section.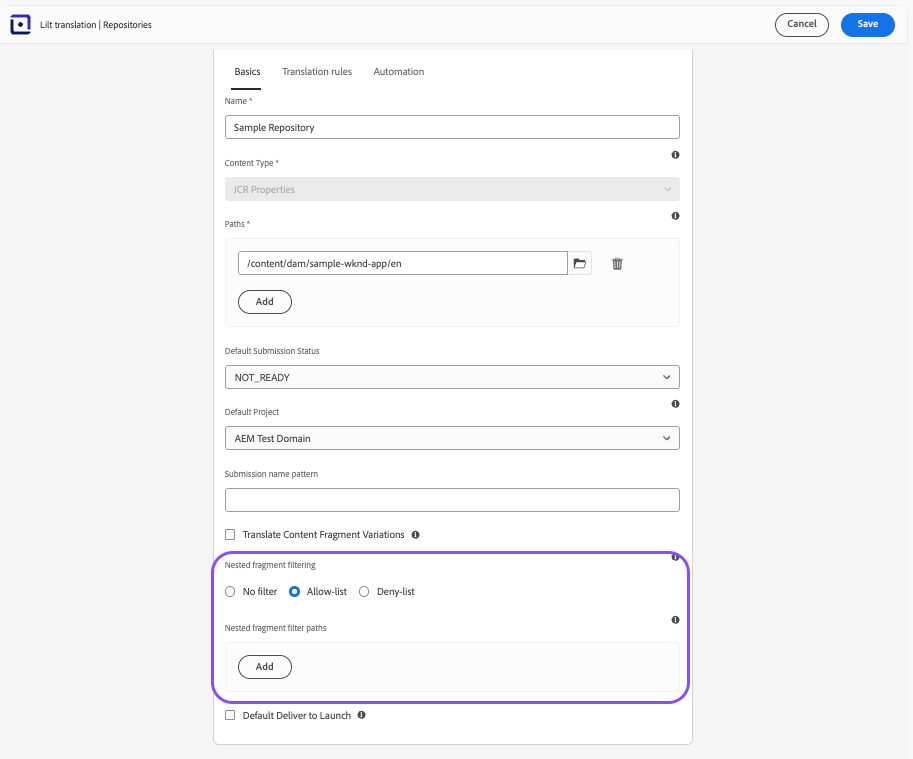
- Choose a mode:
- Allow-list — only nested fragments whose path matches an entry are included.
- Deny-list — all nested fragments are included except those whose path matches an entry.
- Add one path per entry, for example
/content/dam/aem-demo-assets/en/global_header. - Save. The filter applies to the next submission that uses this repository with Translate nested content fragments enabled.
- Entries match the exact path of a nested fragment, or a parent folder of it. To exclude a whole folder, list the folder path with a trailing slash, e.g.
/content/dam/site/en/navigation/. This also excludes everything beneath it, such as/content/dam/site/en/navigation/footer/countrylist. - A folder entry respects folder boundaries:
/content/dam/site/en/navigation/does not match/content/dam/site/en/navigation-old/. - Matching is case sensitive.
/content/dam/site/Team-A/promodoes not match/content/dam/site/team-a/promo. - Wildcards, regular expressions, and partial matches are not supported.
- The filter runs during nested discovery, so filtered-out fragments never appear in the Content step, the Review step, transformation rule validation, or the submission. They are skipped silently; there is no “excluded” indicator.
- Discovery does not continue through an excluded fragment. If fragment A is excluded and A is the only item referencing fragment D, D is excluded too, even if D would otherwise be allowed.
- The content you select directly in the Content step is never filtered. The filter applies only to fragments discovered automatically through the inclusion of nested fragments.
- The filter is ignored when Translate nested content fragments is off for a submission.
- Filters are per repository. Different repositories can use different modes and paths.
- An empty Deny-list includes all nested fragments, the same as having no filter. An empty Allow-list includes none.
- One mode per repository; Allow-list and Deny-list cannot be combined.
- Filtering is by path only — not by tag, fragment model, template, property, or resource type.
- Filters cannot be overridden per submission.
- A fragment is included or excluded as a whole; individual fields cannot be filtered.
- Not available for DAM Asset Content repositories or AEM 6.5 (On-Premise).
- The max depth limit and transformation rule validation still apply to everything that passes the filter.
- Available for JCR Properties repositories only — not shown for DAM Asset Content repositories.
- Transformation rules must cover every discovered fragment path and target language. If a nested fragment has no matching rule, validation will flag it the same way as any other unmatched path.
- The option is off by default and must be enabled per submission.
- Administrators can limit which nested fragments are discovered by path using an allow-list or deny-list on the repository (v1.13+, AEMaaCS only)
FAQ / Troubleshooting
The Lilt Translations app is not visible after installation
The Lilt Translations app is not visible after installation
- Verify the package was installed successfully in Package Manager and that all 4 components are present.
- Check that the package status shows as Installed.
- Restart AEM and check again.
- Review AEM error logs for installation issues.
Cannot connect to the LILT API
Cannot connect to the LILT API
- Verify the Web Services URL is exactly:
https://connectors-admin.lilt.com/api/v1.0 - Check that the API token is correct and has no extra spaces.
- Confirm the token was generated in Connectors Builder for this specific connector.
- Test network connectivity from your AEM instance to
connectors-admin.lilt.com. - Check that firewall rules allow outbound HTTPS traffic.
- If using a proxy, verify the proxy settings in the connector configuration are correct.
My submission is stuck in SENDING or IN_PROGRESS status
My submission is stuck in SENDING or IN_PROGRESS status
This may indicate a sync issue between AEM and LILT. Contact your LILT account team for support, or submit a request through the LILT Help Center.
Translated content appears in the wrong location
Translated content appears in the wrong location
Check your repository’s Transformation Rules. Ensure the source path and target language codes match your AEM content structure. For example, if your English content is at
/content/site/en, verify the rules correctly map to the expected target paths like /content/site/de or /content/site/fr.Source text appears in the translated output
Source text appears in the translated output
- Verify your Translate Properties configuration includes all the properties that need translation.
- Check that the content you submitted is under the correct source language path defined in your transformation rules.
I need to cancel a translation job
I need to cancel a translation job
Contact your LILT account team immediately for cancellations. They can cancel the job in LILT and help you clean up the submission in AEM.
Source content was updated after submission
Source content was updated after submission
Notify your LILT account team of any source changes. They will work with you to ensure the correct content is translated and returned.
We do quality reviews outside of LILT and have corrections to apply
We do quality reviews outside of LILT and have corrections to apply
Contact your LILT account team. If a delivered project requires changes, they will walk you through the process to cancel the submission in AEM so that LILT can redeliver the files after implementing your modifications.
Launch Spaces and Projects
Launch Spaces and Projects
As of connector version 1.10, LILT’s connector can deliver translations into AEM Launches. See Deliver to Launch below. (Launch delivery is available on AEM as a Cloud Service, for Sites pages and Content Fragments.)
The 'selected' and 'sent/imported' counts don't match (e.g. 'See all 44' vs '24/24')
The 'selected' and 'sent/imported' counts don't match (e.g. 'See all 44' vs '24/24')
This is expected, not an error. “See all (Y)” counts the AEM content paths a user selects; the imported count only considers the translatable content imported into LILT which likely differs from all content selected. (files × target languages, after bundling and filtering). The connector consolidates asset metadata into single files (Append mode), bundles all tags into one file, and skips paths with no translatable content. A completed X/X means the submission finished successfully — no content was dropped silently. If you believe specific content is genuinely missing, contact your LILT account team to review that submission.
A nested fragment I expected isn't in my submission
A nested fragment I expected isn't in my submission
Check the repository’s Nested Fragment Filtering section. In Deny-list mode, the fragment or one of its parent folders may be listed; in Allow-list mode, it may not be. Also check that the fragment isn’t referenced only through an excluded fragment, and that the path casing matches exactly.
Submission Retention Policy
Submission Retention Policy
LILT runs weekly cleanup jobs in the LILT + AEM connector and removes projects older than 45 days. This is built to address an AEM limitation where an item in the JCR can have no more than 10k child nodes.
Testing New Connector Versions
AEM is a highly customisable suite, and no two AEM instances are configured the same way. Language master structures, folder hierarchies, content fragment models, experience fragment templates, and workflow models all differ between customers — and sometimes between a customer’s own staging and production environments. Connector behaviour that is perfect in LILT’s testing environment, and even perfect in another customer’s instance, can surface issues unique to your setup. For this reason, customers are expected to test major connector releases in a staging or lower-level environment before deploying to production. We strongly recommend giving the LILT team access to your staging environment during onboarding so we can observe your language master structure and content layout directly and validate behaviour against it. When a new connector version is released, please:- Test the new feature or fix specifically — exercise the change in isolation against representative content.
- Roundtrip-test every content type (content pages, content fragments, experience fragments, assets, tags, etc.) in one language first.
- Roundtrip-test every content type in all target languages once single-language testing passes.
Risks of Skipping Staging Testing
Deploying a new connector version directly to production carries real risk. Issues that staging testing typically catches include:- Content type regressions — a release that handles content pages cleanly may mis-handle content fragments or experience fragments in your specific model configuration.
- Language master / folder structure mismatches — your language master layout may differ from the layouts the release was validated against, causing translations to land in the wrong path or fail to land at all.
- Silent field omissions — custom fields, metadata, or structured content fragment elements unique to your instance may not be picked up or returned as expected.
- Workflow and status desynchronisation — project or file statuses can fall out of sync between AEM and LILT, leaving in-flight work in an ambiguous state that is difficult to unwind in production.
- Production rollback complexity — issues discovered in production after live content has been sent are significantly harder to recover from than the same issues caught in staging, and may require manual re-translation, re-publication, or content surgery in AEM.
- Translator and reviewer time wasted — translation work performed against a misconfigured connector may need to be redone after the underlying issue is fixed.